Pages

Showing posts with label nathalie leonelli. Show all posts

Monday, June 27, 2016

Instalove

This week we asked our DT to create projects that revolved around Social Media. And they came up with some great ideas.


Nathalie Leonelli


Hi there! Did you know that June 29th is Social Media Day? When I found out, I decided to use it as a prompt to look into my online habits. The conclusion: I am addicted to Instagram!!!
The layout I am sharing today was created mostly with the Sunny collection as well as a few items from my stash (see list of supplies below):


The design is based on a Pagemaps sketch from February 2016. 
I created a frame with strips of patterned paper and positioned my photo on one of the strips. The journaling sneaks out of one side and I made the title pop by placing white Thickers on top of hot pink cardstock.
Here are a couple of close-ups:


Here's one last look at the whole 8.5x11 page:


We are all on social media these days but they evolve and we do as well. As I wrote in my journaling above, I went from forums and blogs to mostly Instagram which I am sure will be replaced down the line by something else, hence the idea of recording it on a page! And lastly, include the "tool" you use to get online because that will change even faster! Imagine seeing a page about the computer or phone your parents or grandparents were using ;)

As this is my last project for Imaginisce, I would like to thank Cari, our design team coordinator for selecting me to join the team! It has been fun, I have made new friends and I wish her and the other designers the best!

Supplies:

Imaginisce: patterned papers, American Crafts: fabric Thickers, cardstock, Simple Stories: die-cut, Studio Calico and Scraptastic Club: wood veneers, Scraptastic Club: flair button.

Wednesday, June 15, 2016

Father's Day Cards

Are you in need of some fun & handsome cards for Dad? Then check out these great ideas below!!


Nathalie Leonelli

Hello, I am back here today to continue our Father's Day series. I have created two fun cards with the Parrrty Me Hearty collection:


Both cards were inspired by 3 tutorials I found on Pinterest and that you will find here on my Father's Day board.
This first one is for the pirate dad, or the cool dad with a sense of humor ;) The jacket is made with the “Jolly Roger” patterned paper and the bow with a piece of “Yo-Ho” paper:


Here's a look at the inside when you open up the jacket. I added the sentiment (stamped) on top of the shirt:


My second card is for the music loving dad:


Once again the bowtie is made with a piece of Yo-Ho” paper (the reverse side) and the suspenders are made out of “Sirens Song”.

For both cards, I simply added buttons and cardstock from my stash and used my 1-2-3 punch board from We R Memory Keepers to make the bowties. The first card measures 4x6 and the second 4x51/2 inches.

I am certain they would make any dad smile this Sunday but they could also work great for birthdays!

Supplies:

Imaginisce: patterned papers, American Crafts: cardstock (colored), We R Memory Keepers: 1-2-3 punch board, Scraptastic Club: stamp, Georgia-Pacific: cardstock (white), misc. buttons.

Friday, June 3, 2016

Sunny Card set

Looking for some fun, bright, ummer themed cards? Check out these adorable creations!


Nathalie Leonelli


All sorts of Sunny cards!

Hi everyone! I am back today sharing a few projects created with the Sunny collection. Since today we’re celebrating National Donut Day here in the US I made a donut themed card!


Only using two circle punches and a scallop punch I created the donuts out of patterned papers and cardstock. I also made a matching envelope using my WRMK 1-2-3 punch. I love how the enamel dots look like sprinkles that fell off :)

My second card celebrates the arrival of Summer with the cool flamingo card from the “Good Vibe” paper:


I picked a bright pink cardstock as the base and then layered a few patterned papers under the flamingo, making banners with a couple of them. The sentiment comes from a strip of "Hello Sunshine" paper. I also added stitching, a button, string and enamel dots for texture and dimension.

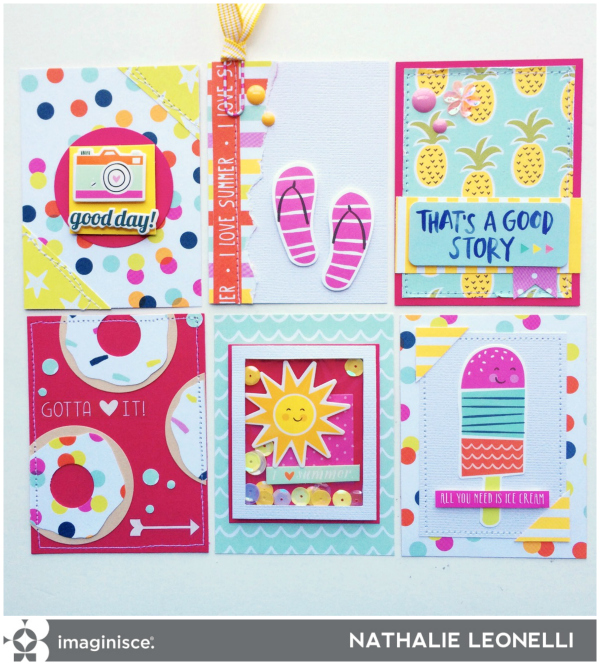
Finally, I have recently been making a lot of pre-made cards for pocket scrapbooking and have been sharing them on my Instagram account but I wanted to show you here the ones I created with the Sunny collection, maybe they will inspire you to make your own:


My latest (and new favorite) is this shaker card using one of the Sunny sticker stacker:


I have been having so much fun with this collection! I am glad my favorite LSS is carrying it and I hope you can get your hands on it too!
Happy scrapping!

Supply List:

Imaginisce patterned papers, sticker stackers, alpha stickers, phrase stickers, ephemera pack (Sunny collection) and enamel dots; American Crafts cardstock and ribbon; Paper Tales tag; Scraptastic Club stamp; misc. paper clip, button, string and other stickers.

Friday, May 20, 2016

Remember

Today we've got a special treat - a layout & card combo created by DT member Nathalie. It's beautiful!


Nathalie Leonelli

Memorial Day is approaching and I am here to share a couple of projects I created for this occasion using the Par-r-rty Me Hearty collection. You will also see how you can create a layout based on a card design.


The first project I created was the card and I was happy to find the perfect papers in the Par-r-rty Me Hearty collection to make a card for a Navy veteran:


Most often, I will create a card after I am done with a layout but here, once I was done with my card, it gave me the inspiration to create an 8.5x11 page following the same design. I scanned some older photos I had forgotten about long ago!


I created the same split background (different blue paper but from the same collection) and used pretty much the same supplies and elements: vellum banner for the title as I did for the sentiment, a stitched frame, tags and enamel dots.
Here are a few details:


Funny how inspiration can manifest itself but following my card design allowed me to create a layout rather quickly and all the supplies were already out!

I wish you a wonderful Memorial Day weekend! And don't forget to thank a Veteran!

Supply List:
Card: Imaginisce patterned papers (Par-r-ty Me Hearty) and enamel dots, Paper Tales tag and charm; Scraptastic Club stamp, Georgia-Pacific cardstock

Layout: Imaginisce patterned papers, American Crafts Thickers (Par-r-rty Me Hearty); Georgia-Pacific cardstock; Studio Calico star sequins, Paper Tales tags, Feed Your Craft mini flair

Monday, May 9, 2016

Hello Sunshine (pocket-letter style!)

Have you heard about pocket pages and pocket letters? No?
Well, then you're in for a treat today.  Check out this awesome way to celebrate a season, birthday, special event, etc. The possibilities are endless!


Nathalie Leonelli

Hi there! I am back today to share a pocket letter celebrating the approach of Summer. I love making, sending and receiving pocket letters but if you are not familiar with them, you can read more about the basics of pocket letters on my blog. The Sunny collection has so many fun papers and elements that it is perfect for this kind of project!


For three of my pockets I cut down ready-made cards from the  "Good Vibes" paper and the rest was cut from different patterned papers from the collection. You can see many of the goodies I am sending but, amongst the stuff you can't see, there is a letter to the recipient which is clipped behind the "Hello Sunshine!" card and a tea bag (added after the photo was taken) behind the "4 you" flamingo card:


I used my We R Memory Keepers 1-2-3 Punch board to create this little coin envelope out of the "Camera Love" paper. It adds interest (and mystery)... what's inside? Sequins and crab die-cuts :)


I hope to have inspired you to have fun with your Sunny collection because I did! And do give pocket letters a try! You won't regret it!


Happy crafting!


Supplies: Imaginisce: patterned papers, die-cut shapes, sticker stackers, phrase stickers (Sunny collection); American Crafts: ribbons, Thickers; Simple Stories: enamel dots; Freckled Fawn: washi tape; Staples: paper clips

Wednesday, April 27, 2016

Teacher Appreciation

Did you have a favourite teacher growing up?
Do your children have a teacher that has helped to make school enjoyable and special?

Well, Tues., May 3rd is Teacher Appreciation Day and we asked a couple of our design team members to create something for this special day.


Nathalie Leonelli


Happy Hump Day Imaginisce fans! I am here today to share a happy little gift set I created for a favorite preschool teacher with my favorite papers from the Sunny collection.


The gift set includes home decor, a decorated frame, a box of sweets and a coordinating card.
For the home decor, I bought a 4x6 frame from Michael's and discarded the glass. I lined the background with "Pineapple Days" (really my favorite paper in this collection) and added a card from the "Good Vibes" paper layered on top of the stripey side of "Fun in the Sun", adhered with a few foam dots for dimension. The ribbon and enamel dots add different textures and a bit of color.


The little gift box was created following a tutorial I pinned a while ago, again with "Pineapple Days".


Finally, the card was super simple to make with a border made with "Fun in the Sun" and two super cute die-cut shapes, also from the Sunny collection, popped up on foam dots. That pineapple die-cut is to die for, don't you think?


Here's my little gift ready to go. I love how it all coordinates and I can't help but smile when I look at it :) It is pretty much guaranteed to uplift anybody’s spirit, teacher or not!


Thank you for stopping by! If you have any questions, feel free to leave them in the comments!

Supplies:

Imaginisce: patterned papers, die-cut shapes (Sunny collection); American Crafts: ribbons; Simple Stories: enamel dots; Georgia-Pacific: cardstock; Michael's: frame

Wednesday, April 13, 2016

Beach Fun

Who loves going to the beach? Well, if you're a beach lover than you're going to love this layout by DT member Nathalie!


Hello! I am here today to share a new 8.5x11 layout created with the fun and bright Sunny collection. This collection has totally inspired me to dig through last summer’s photos from our vacation at the beach:


One of my favorite things in the collection is the pack of ephemera and it was the starting point for this page. Once I had selected my photos I worked on the cluster at the bottom of the page. I love the mixture of die-cuts, acetate shapes and Sticker Stacker! I added a few stitches to ground the grouping a bit more.


The photos are layered on the B sides of "Fun in the Sun" and "Sweet Melon". The pretty "Hello Summer!" strip comes from the bottom of the "Sweet Melon" paper.


A few more pieces from the ephemera pack were added to the top part of the page, balancing the bottom heavy page. Isn't that sun the cutest?! 


A side note regarding the acetate shapes in the ephemera pack: it's hard to see but don't forget to peel off the plastic film on top. You will discover a much brighter and shinier embellishment once you do :)


My design is based on the April sketch on the Stuck?! Sketches blog (by DT member Laura Whitaker). Here's one more look at the finished page:


One thing for sure, this colorful collection will make you long for Summer… 
Thank you for stopping by!


Supplies:

Imaginisce: patterned papers, Sticker Stackers, ephemera pack (Sunny collection), enamel dots; Amy Tangerine for American Crafts: date stamp; Georgia-Pacific: cardstock

Friday, March 18, 2016

St. Patrick's Day Banner

Wrapping up our St. Patty's themed week we have this fabulous banner project designed by Nathalie Leonelli.


Did you celebrate Saint-Patrick’s Day yesterday? We don’t really do anything special in my family but I like to decorate for the occasion nonetheless. I pull out my kids Saint Patrick Day art and crafts from elementary school but since they are now in Junior and High school I don’t get any new ones, sooooo…. I decided to make my own decoration this year!


I created this banner with the Parrrty Me Hearty collection which has several hues of green perfect for the Irish celebration! The pennants from the “Shell-A-Brate” paper were my starting point.


After cutting 5 of them and adding Thickers (also from the Parrrty Me Hearty collection), I cut a series of slightly larger pennants from kraft cardstock to adhere them on.


You could use a punch or die-cutting machine but I hand cut a heart template and then 6 hearts from the “Sand Castles” paper to form the shamrocks. 


I sewed around each pennant and then fed them one by one into the sewing machine to put the banner together. After doing that, I adhered the shamrocks and the little ribbon bows as my final touch.


I’ll probably keep it up a few more days because I like it so much

Thank you for stopping by and do not hesitate to let me know if you have any questions regarding the making of this project.


Supply List: 

Imaginisce patterned papers, American Crafts Thickers (Par-r-rty Me Hearty); American Crafts cardstock; Michael’s ribbon

Monday, March 7, 2016

DIY Mermaid Mobile

Welcome to another week of crafts!!
Check out this stunning mobile that Nathlie has created!


DIY Mermaid Mobile:

A friend of mine told me recently that her young daughter was obsessed with mermaids so I decided to create a little DIY mobile for her room with the die-cuts from the Parrrty Me Hearty collection:


In order to recreate it, you will need this pack of die-cuts:


And the following supplies:


  • Floral wire (or any 20 gauge wire)
  • A needle and thread
  • Wire cutter
  • Liquid glue

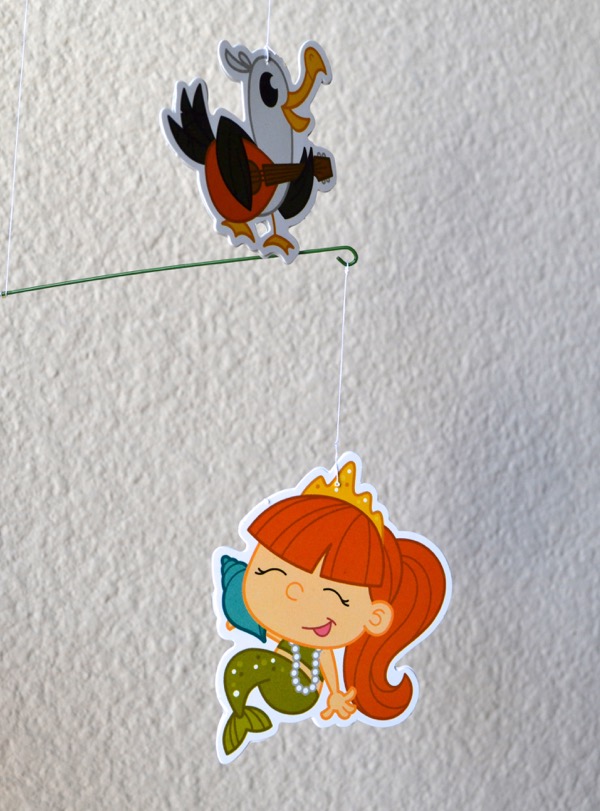
One of the greatest things about these die-cuts, which prompted my idea, is that they each come with their mirror image, so you can glue them back to back (perfect when they twirl around):


The next step is to cut two pieces of wire and curve the ends as seen below:


Using a needle and thread, attach each die-cuts to the end of the wires:


Here’s a photo of the mobile flat on the wall so you see the design I created:


The most difficult part of this project is to balance it all. To do so, I held it up and moved the tied thread along the wire until it looked balance, then in order for it to stay at that spot I dropped a bit of liquid glue so that the thread would stay in place. Once it’s dry, you can finally enjoy it twirling around:


I will answer any question you might have in the comments below. I hope my friend’s daughter will like it!


Supplies:
Imaginisce: ParrrtyMe Hearty (Die cuts)
Other: Floral wire, needle & thread, wire cutter, liquid glue


Thank you for stopping by!

LinkWithin

Related Posts with Thumbnails