Pages

Showing posts with label Michelle Unruh. Show all posts

Tuesday, December 20, 2011

Imaginsce & Clearsnap Holiday Blog Hop Day 2


Welcome back to Day 2 of our Holiday Blog Hop with Clearsnap.

We hope you enjoyed yesterday's projects as we've got some more to share with you.


Cristal Hobbs

Cristal used the Sparkle Fibers to add glitter and texture to her beautiful card.

Supplies: Clearsnap (Glitter, Fibers, Deisgn Adhesives), Imaginisce (Santa's Little Helper), Glue Arts Extreme Adhesive, Beacon Fabric-Tac


Lydia Jackson

Lydia used dragged the tip of the smooth applicator across the fabric of the button. What a wonderful 'candy-cane' effect she created!

Supplies: Imaginisce (Geek Is Chic, Santa's Little Helper), Core'dinations Colorcore cardstock, Clearsnap (Smooth, Glitter, Design Adhesives)


Michelle Unruh

Card#1
Michelle used an ink pad to 'paint' the color onto the stamped image. She also used the Glitter glue and Glitter to glitz up the tiny flowers.

Supplies: Product List: Bazzill Cardstock; Imaginisce papers and heart glam; Clear snap ink, glitter and glitter gloss; Glue Arts adhesive; Micron pen; Basic Grey rubon.


Card#2
Michelle cut the grass design using the Platin Cartridge, a hyrdrangea punch to add the small flowers and then adhered a layer of Glitter Glue & then sprinkled the Sparkle fibers overtop of the grass cut-out.

Supplies: Imaginisce (Hippity Hop papers, Glitter Glams), Bazzill Basic (Cardstock), Cricut (Plantin Schoolbook cartridge), Clearsnap (ink & fibers), Heidi Swapp (rub-ons), Ek Success (Corner rounder punch), Creative Memories (templates to cut the egg shape), Glue Arts (Glue Glider Adhesive)


Please join us again tomorrow for more holiday inspiration.
And don't forget about our giveaway. Click here for details.

We're going to keep the prize a secret until the day we announce the winner! (afterall, aren't all of you Christmas presents a surprise??!)

Monday, December 12, 2011

HIppity Hop - Day 1

We realize that it's the Holiday Season right now and with Christmas right around the corner it's been hard to think of spring and Easter but we're very excited to share with you a new release called Hippity Hop. The Design Team have been hard at work creating a plethora of fantastic projects that will be shared throughout the week.

Here's a look at the collection of papers.

HONEY BUNNY
HAPPY SPRING
DANCE IN THE RAIN
FLY A KITE
CHICK-A-DEE
SPRING SHOWERS
Today we're going to share a variety of projects from cards & layouts to home decor & mini albums.


Now we couldn't have a big release party full of great projects without giving you a chance to play with this new collection.

So, we're going to Giveaway ....

a full collection of Hippity Hop
to one of our lucky followers!!

All you have to do is leave a comment on every post this week (Mon-Thurs)
and you'll be entered to win.
Today we'd love for you to tell us one of your favorite things to do in the spring.

Please join us again tomorrow for more incredible Hippity Hop projects from our Design Team.

And don't forget that Friday is our 2012 Design Team Announcement!!

Wednesday, December 7, 2011

Christmas Inspiration - Layouts


Do you take lots of pictures during the holidays?
I know I have and then when it comes time to scrapbooking them I'm just never inspired because year after year they are all so similiar that I admit I get bored of the same theme.

However the Design Team has created some fabulous layouts to share with you today that will definitely inspire you when you're creating your holiday themed layouts.


"From Santa"
Supplies: Imaginisce (Santa's Little Helper (papers, die-cuts), Foam Squares (red), i-rock & gems, My Little Shoebox (alpha stickers), twine


"My Little Elf on the Shelf"
Michelle used the POGO stick on the pom-pom of the elf and then added some glitter. She also added more glitter to the elf with Stickles and then used the Imaginisce Foam Tape to adhere the die-cuts to her layout.
Supplies: Imaginisce (Santa's Little Helper collection) POGO, Foam Tape, i-rock tool & Glam ROcks; Echo Park Dots & Strips, My Little Shoebox (alpha stickers), Glitter, Stickles


"Snow Penquin"
Supplies: Imaginisce (i-rock tool & Glam RocksChristmas Cottage, Penquin is from Santa's Little Helper collection), My Little Shoebox (alpha stickers), Core'dinations Colorcore Cardstock

Don't forget about our Giveaway this week!!
All you have to do is leave a post a comment here today telling us your favorite thing about the holidays and you'll be entered to win!

Check Monday's post HERE for all the details!


Update on our DT call:
I know many of you are anxiously awaiting the news and we just want to let you know that we're still in the process of picking our new 2012 Design Team.
It's been a big job going through all the amazing applications.

We will be posting the new team on Dec., 16th.
Soon everyone ... very soon!!


Join us again tomorrow for Christmas Inspiration Home Decor style!

Monday, November 21, 2011

Day 1 ~ The i-top 2.0


We are thrilled to introduce the new & improved i-top tool.

You will find it to be lighter weight than the original
which makes it easier to grip.
It's a darker pink in color and the rubber keeps those brads in place
while you are working with the tool.

We have come out with a new carriage (34mm size)
that you attach to the i-top tool just as you did with the other heads.
This will allow you to create with the extra-large brads (34mm).
They are absolutely so much fun to create projects with
and our Design Team has been busy at work creating with their new tools.

Throughout the week we will be sharing many wonderful projectswith you,
The Design Team was asked to create Thanksgiving themed projects using the i-top tool.

Let's see what they've done.


"Happy Thanksgiving"

Design Team member, Michelle, created this gorgeous project using some of the Happy Harvest collection & Roly Rosies. She made some i-top magnets to hold the paper in place on her 8x8 Creative Memories display board and large brads for the centers of the flowers in the beautiful cornucopia.

Here's some close-up shots.


"Simple Joys"

Tracey created this wonderful fall themed layout using Happy Harvest collection. She used the i-top and covered some brads with burlap to use as embellishments for the flowers and leaves. You can use just about anything to cover the brads with and that's what makes the i-top 2.0 so much fun to use!


"Thank You" Hostess Gift

Are you in need of a hostess gift for the turkey dinners you've been
invited to this Thanksgiving? This would make the perfect gift!
Courtney has creatively embellished this bottle of wine with cut out leaves from our Happy Harvest collection and used the i-top brads to finish off the nicely tied raffia bow.


"Autumn Splendor"

Thanksgiving is a time to be thankful for so much. The card that Keely created is perfect for this time of the year to remind friends & family how thankful you are for them.


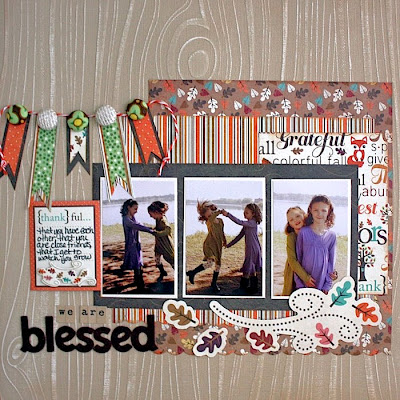
"We Are Blessed"

Robyn used the small brad daddies to create the banner. She covered them with fabric and burlap and then wrapped some twine around each one to connect them leaving a little bit hanging at each end.


... and now it's time for a
Giveaway!!!

We couldn't just show you these wonderful projects and
tell you how amazing the new i-top 2.0 is
without giving you a chance to win one!

So, if you would like to win an
i-top 2.0 tool & accessories
all you have to do is comment on every post this week (Monday to Thursday)
and your name will be entered.

Winner will be posted on Friday.

********

We also have a winner to announce from our Facebook contest with Glue Arts this past weekend.

CONTEST:
Facebook Contest with Glue Arts

PRIZE:
Glue Arts package
The lucky WINNER of this awesome Glue Arts prize is ...

I was sent by Glue Arts.....love your stuff....the fall harvest line is soooo cute!

· · Saturday at 6:20pm ·

Congrulations Shilo Mias Huxtable!


How to Claim Your Prize Package:
Please email your shipping information to: Contact.imaginisce@gmail.com
no later than midnight Friday, December 2nd, 2011 and put
the giveaway name in the Subject Line.
We will get your prize package out to you as soon as we can.
Congratulations!!

Monday, November 14, 2011

Glue Arts Week Blog Hop Day 1


We are very excited to team up with Glue Arts this week!
They've sent our team a wonderful array of adhesive products
and our Design Team have been working hard on a variety of projects
to share with you over the next few days.

Now don't forget we called this a BLOG HOP!
That means the Glue Arts is also posting some wonderful projects
over on their blog as well.
So when you're finished here we want you to HOP on over to
their blog and check it out.


"I Love Fall"


Below you can see that Michelle has used the 3D foam tape to add dimension
to the leaves and some adhesive squares to place the ribbon on her layout.
Supplies used: Imaginisce Happy Harvest's Autumn Splendor, Fall into Fun, I love fall, Caramel apples papers; Canvas stickers, swirling leaves Snag 'em stamps; Pile on Fun sticker stackers; Glue Arts Glue Glider; DMC Floss, Misc button; Bazzill cardstock, Versamark ink. CM punch; Gelly Roller white pen; Ribbon; Colorbox Chalk ink


"Holiday Ornament"

Cut patterned paper at 8 1/2" x 11" and then cut 1 inch strips = 11 in total.
Staple center and fold using a Glue Arts Extreme Adhesive Square to hold in place.
Add embellishment of choice to center and some ribbon.
Now you're ready to hang the ornament on your tree.
Supplies used: Imaginisce ('Christmas Magic' from Santa's Little Helper);
Glue Arts 3D Adhesive Squares, Misc ribbon


"DIY Washi Tape Birthday Card"

Supplies used: Imaginisce Birthday Bash "Wish Big" paper and stamps and Glue Arts 3D Combo Pac "U CUT IT #D Adhesive Foam Blanks and Glue Arts Glue Glider Pro


"Spring Fever"

Sophia has used the 3D foam tape to add
some dimension to the die-cut paper strip.

Supplies used: Imaginisce (Splash Dance Bathing Beauties, Adhesives Border strips & chipboard
stickers from Enchanted Collection, I-rock flowers); White Bazzill Cardstock;
Daisy D's Rub-on Spring Fever Title; Glitz Black Border Frame


"Christmas Banner"


Supplies used: Imaginisce (Santa's Little Helper collection); Glue Arts (Glue Glider Pro, 3D foam tape,
Extreme Adhesive Squares; cloths-pegs


"Snowflake" card

Here are a few tips from Cristal on how she used
the adhesive squares to add glitter to her snowflake.

Choose which side you want the glitter
and lay that gently onto the Glue Arts Extreme Adhesive Square.

Wrap adhesive square around the end of the snowflake then mold with fingers.

Lay on non-stick surface and sprinkle glitter overtop. Shake off excess glitter.
You will notice that there will be some adhesive on the back of the snowflake which
you can use to adhere to the front of the card.
The finished snowflake!
Supplies used: Imaginisce (Santa's Little Helper, Cottage Christmas (snowflake)), Glue Arts Extreme Adhesive Squares, Glue Arts ribbon adhesive, Glue Arts Glue Glider Pro, Pink Paislee Glitter, Ranger Alcohol Inks, Clear Scraps Clear N Cip Frame, Ranger Stickles, Offray Ribbon, Bazzill Gem


Giveaway!
How would you like to win an
entire collection of Santa's Little Helper?


All you have to do is leave a comment
on EVERY post this week & on the Glue Arts blog as well.
Winner will be announced at the end of the week.


Please join us again tomorrow for more inspiration
and wonderful projects from our Design Team..

LinkWithin

Related Posts with Thumbnails