Pages

Showing posts with label Heather Leopard. Show all posts

Wednesday, December 12, 2012

Christmas Cards by Heather

Today we have Heather Leopard 
sharing some fun cards that she made for the holiday season.


Her first card resembles a door with a wreath hanging on it. Very cute.

Supplies used:
Imaginisce Christmas Cheer collection:
Patterned papers (400036, 400039)
Die Cut (400052) 
Chipboard Stickers (400051)


Heather's next card uses a sweet holiday sentiment card from the Christmas Cheer collection.

Supplies used:
Imaginisce Christmas Cheer collection:
Patterned papers (400038, 400036, 400039)
Sticker Stackers (400049)


Tuesday, November 13, 2012

Love You More Release Party - Day 2


Welcome to Day 2 of our Love You More release party!


So are you drooling yet??
Isn't this an incredible collection?

Not only are the patterned papers awesome but Imaginisce has come out with some incredible 12x12 sticker sheets.  And guess what??
There's alphabet stickers!!!!

Love Letters 12x12 Sticker Sheet

Love Birds 12x12 Sticker Sheet

How fun are these?
The possibilities are endless for these designs.

Now let's take a look at what a few more of our Design Team members have created with this collection.

*******

Heather Leopard

I decided to make 2 mini albums with this collection. I cut the album from all the 12x12 paper in the Imaginisce Love You More collection, using my CAMEO and various cutting files (details on my blog).

Both minis are for my girls – the Love You More mini will be a mini album with photos and notes documenting me and my hubby’s love story ‘cause I like to make sure they know how much we care for each other.


The XOXO one is going to be a coupon book for my girls to. I’ll be adding little coupon notes to the slip in cards for fun activities we can do together as a family in February.


Supplies: Imaginisce (Love You More collection: patterned papers (Border Love, Love Notes, Heart Attack, Bee Mine, Hugs & Kisses, Cupids Arrow, Groovy Love,  Brave Heart), Stickers (Love Birds), Washi Tape)


Regina Mangum


Love Birds Card
When I saw the Border Love patterned paper, I just knew I wanted to use the sweet little love birds on a card. I fussy cut a pair along with a banner. For a finishing touch, I added one of the coordinating buttons and a sweet little bow.


Supplies:
Patterned paper: Border Love, Love Notes, Brave Heart from Love You More Collection (Imaginisce); CardstockSolar White (Neenah); Dies: Lacey Squares (Spellbinders); Fibers: ribbon (May Arts); Accents: Button from Push My Button pack (Imaginisce)


You & Me Frame
My best little valentine is my son. For some reason, we don't have very many photos of the two of us together, so I wanted to make something special to display one of the few photos we do have. I created this beveled frame from the darling Heart Attach and Make a Wish patterned paper, adding Love Letter alphabet and Love Birds stickers for a pretty frame to brighten my craft room.


Supplies:
Patterned paper Heart Attach, Make a Wish from Love You More Collection (Imaginisce); Stickers: Love Letter alphabet, Love Birds (Imaginisce); Electronic File: Beveled Frame (Lori Whitlock for Silhouette)


*******


Would you like to be the lucky winner of this fabulous collection?


Just leave us a comment on the blog post today and 
tell us what you think of our new sticker sheets.
We will randomly select a winner from all the comments posted throughout the week.
(The winner will be announced here on the blog Friday, Nov. 16th)

Join us again tomorrow for Day 3 of our LYM release party!

Thursday, November 8, 2012

Veteran's Week - Day 4


Thank you for joining us this past week.

Today is Day 4 of our Veteran's Week Blog Hop and we hope that you have appreciated the projects that our design team has been sharing with you on their blog.

Today's Blog Hop order is as follows:


Thank you again for joining us these last few days.
And don't forget: Make sure to check out the various Design Team members blogs 
to see if you were a winner for one of their Giveaways!!!

Pop by again tomorrow as we feature a fabulous i-Spy Project!

Tuesday, October 16, 2012

Let's Clicut with Heather!


Today we have the talented Heather Leopard sharing a project that she created using the Clicut.

*******

At Halloween time here in the U.S. the neighborhood kids like to "BOO" each other, at least here in our neighborhood. It usually consists of a little goody bag treat with a poem inside along with an "I've been boo'd" sign to put on your door. You don't say who it's from, you just leave it when no one is looking. Naturally, after we got boo's this year, I had to create a card for the basket. Seeing as how I'm the only crafty mama on the block I am sure they will figure out who it's from but I just couldn't resist.


I put the card together and then I used my Clicut and my cutting mat to trim the paper around the sides of the card after I adhered it. I also used my Clicut to make the word bubble. This is so trendy right now and I thought I'd give it a go. I simply cut out the letters and then I cut around them to form the bubble.


Supplies: Clicut and cutting mat, 400035 die cuts, 400020 12x12 paper, 400022 12x12 paper and 400023 12x12 paper.

Monday, October 8, 2012

Share-a-Card - Day 1

We have a very exciting week planned here on the Imaginisce blog! 

We know that there are many crafters out there that create cards for the holidays.  
We also know that many of you have started making some already.

Well our Design Team have been busy little elves lately and have been creating a plethora of beautifully themed holiday cards that they are going to send off to a charity.


The organization is called Share-a-card.  
Right now they are holding a Holiday Card Project where they asking for handmade holiday cards. They would love to reach their goal of 10,000 this year. Last year they received almost 9,000 cards.

The purpose of their Holiday card project is:
... to gather Christmas greeting cards and distribute them to seriously ill people who have been featured on ShareaCard and are in active status (we have had an update within the last 6 months). It is well known that the holiday season is extremely depressing to the shut-in and the very ill. They watch all around them as everyone shops and bakes and enjoy themselves, all the while many cannot even leave their homes and are ill from all their medical treatments. YOU can help make a difference in their holiday season! Just imagine the delight when a Feature receives a large box filled with greeting cards from all the United States and Canada, wishing them well and sending along caring thoughts. EVERY card received will make an impact this holiday!

Anyone can participate!  For more detailed info on this fabulous project you can go to their website, Share-a-card or click HERE.
If you aren't a cardmaker you will see that there are a variety of ways in which you can participate.

We would love to challenge you to participate in this project with us & our Design Team.


Here is are the Guidelines for the Holiday Card Project:


*1-- Cards should be signed with your first name and the state in which you are from.

 *2-- Cards can be store bought/handmade or even construction paper. It's the intent behind the card that means the most!

*3--You may mail to all of the Features or select from the list on the right.

*4--We appreciate all cards but suggest cheerful cards of encouragement, rather than "Get Well cards", since our Feature's are all at various stages of their illnesses.

*5--The Year End Feature's names were not known at press time so you may either put a post it note on the front stipulating "December Feature #1" etc... or leave unaddressed and we will write their name on the envelope for you when we sort them.

*6--There is no need to stamp your envelopes in a package of many cards or include stamps.

*7--You may mail your cards as early as you wish but no later than December 1st.

 *8--Small gifts/stickers etc..are accepted but not required!
They will be forwarded onto the Feature's they are addressed to. ShareaCard will cover that postage as well.

*9-- Our Features love children's cards! If possible, have them sign with their first name and their age.

*10--Envelopes are not required. All cards are sorted into boxes so our Features receive your cards no matter how you send them!

*11-- If your cards arrive unaddressed or not in envelopes... no problem! We count all cards so if for example, you send 24 cards...we assume you are sending to all the women. If you send 41 cards, we assume you are sending to all Features. Don't worry, all the cards are distributed!

*12-- Ask your friends to help! We'd love to have your family/youth group/stamping friends/scout troop etc...send cards! If your group needs more info on ShareaCard, we'd be happy to get them the information needed!

*13--Since you have requested to be able to send cards earlier this year and avoid confusion in sorting, we ask that you make sure your outside card package says:
Holiday Card Project


Please follow these addressing instructions:
To mail an individual card to a feature:
Feature Name
Holiday Card Project
c/o ShareaCard.org
  • 992 Hershey Road
  •                              Elizabethtown, Pa 17022
     
     
    To mail a package of multiple cards:
     
    Holiday Card Project
    c/o ShareaCard.org
  • 992 Hershey Road
  •                              Elizabethtown, Pa 17022


    *******

    Now let's take a look at what our some of our Design Team gals have created.

    Santa Card

    The "Christmas Cheer" die-cuts package comes with a ton of things in it - some are quite large, like this Santa, and therefore could make perfect shaped cards! To make a shaped card, get some thick cardstock that could serve as a card base, and score and then fold in half. Adhere your die-cut, and cut out along one side of it. To finish up, don't forget to add some white cardstock or light paper on the inside so you can write a note.


    Supplies: Paper, Die-Cut: Imaginisce (Christmas Cheer), Bling: Imaginisce (I-Rock), Cardstock: My Favorite Things, Ink: Tsukineko. 


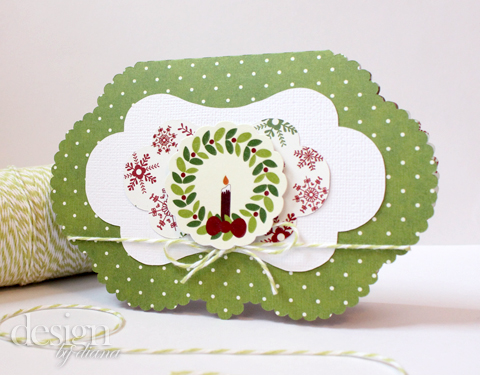
    Christmas Wreath Card:

    With all the stickers and other embellishments that coordinate with this collection, putting Christmas cards together is a breeze. If you have time, adding a little ribbon or bling to each adds a more personal touch. Otherwise, if you have a ton of Christmas cards to put out, some paper and a sticker or die-cut is plenty for a unique and sweet card :)
    Supplies: Paper, Dimenstional Sticker: Imaginisce (Christmas Cheer), Ribbon: May Arts, Die-Cutting Machine: Sizzix (Big Shot), Die: Cheery Lynn (French Pastry Doily), Ink: Tsukineko, Other: cardstock.


    Here are two holiday cards using the fabulous Christmas Cheer collection. It is so easy to mix and match the patterns and colors in these papers to create layered cards. The inside of the cards are stamped with a holiday sentiment sending Christmas wishes.


    SUPPLIES: Imaginisce Christmas Cheer pattern papers Christmas Joy and Snowdrift, 3-D stickers; twine; Cameo; cardstock


    I created the card using a cutting file, which I downloaded from the Silhouette store. I then pulled out my i-rock and adorned the trunk of the tree with brown, square glam rocks and added "ornaments" using the round glam rocks. I had soo much fun decorating this tree for someone special.


    Supplies:
    Papers: 400041, 400037, 400036, 400040
    i-rock and glam rocks
    Brown cardstock for the base
    Silhouette CAMEO


    *******

    Thanks ladies. These are just gorgeous and the people who receive will be so grateful.

    Join us again tomorrow for more holiday themed cards.
    We hope that you'll also join us in creating cards to send off to Share-a-Card's Holiday Card Project!

    Monday, September 24, 2012

    Design Team Challenge - Day 1

    We think we have an awesome group of designers this year.  They continually create projects that just 'wow' us all and so we thought we'd give them a little challenge. 
    We did do a similiar type challenge this year and this one just seems to take many of them out of their comfort zone.  Which, even though, they may not admit it, is a good thing. ;)

    Anyways, here's their challenge for the week.

    DESIGN TEAM CHALLENGE:

    • Create a non-traditional layout (no circle, no squares, etc). Really think out of the ordinary here.
    • Use the color ORANGE somewhere on your project.
    • Use the i-top tool on your project.


    So ... let's take a look at what THREE of our designers created.

    *******

    Adora Concepcion

    For this challenge, I created a Christmas Tree shaped card. Fold a 12X12 patterned paper and cut a tree shape leaving one side intact. For added dimension, i cut a smaller shape tree and attached it together using pop-dots. Then embellished it with cut out shape, die cuts and
    small matching buttons.


    Supplies: Imaginisce Christmas Cheer Papers; Christmas Joy, Be Jolly & Warm Wishes; Imaginisce Rejoice Die Cuts, Imaginisce Tool;  I-Bond & I -top;
    and Imaginisce Small Brad Daddies.


    Heather Leopard

    I love to give and receive homemade cards. I'd guess 95% of the cards I create are the typical rectangle shape but every now and again it's fun to mix it up. Today I cut this cute flower card using my CAMEO and the Makin' Waves collection. I added some sparkle and shine using my i-rock. I can't wait to give this to someone special.


    Supplies: Imaginisce (Makin' Waves collection)


    Ilene Tell

    This was a bit outside my comfort zone, but it ended up being so fun to be challenged to think outside the box! I had these cute pics of the kids after a bath, that I've been hanging onto forever, and I knew this was the perfect challenge to finally use them. What better way to show off some pictures of the kids at home, than with a home-shaped layout :) To create the roof, I punched many layers with a border punch and then layered them on top of each other. Super simple!


    Supplies:
    Paper: Imaginisce (Makin' Waves, Monster Mash), Tool: I-Top + Brad Daddies, Border Punch: Martha Stewart Crafts, Flowers: Prima Marketing, Door Embellishment: Recollections, Die-Cutting Machine: Sizzix (Big Shot), Heart Die: Tim Holtz, House Template: October Afternoon, Foam Letters: American Crafts, Pink Paislee, Color Spray: Tattered Angels, Ink: Cat's Eye Chalk Ink.


    ******
    Thanks ladies.  

    Wow! Those were fabulous ideas for this challenge!
    You're welcome to take part in this challenge too - just share/post your projects on our Facebook wall and maybe we'll use your project on our i-Spy Feature!!

    Don't forget about our September Monthly Challenge either.  Deadline for submissions is tomorrow!

    Thursday, September 13, 2012

    Product Spotlight - Snag 'em Stamps


    Welcome back!
    We hope that you've been enjoying the creations that our Designers have been sharing with you using our Snag 'em Stamps.

    They truly are unique & so much fun to use. They can be used on cards, layouts and altered projects.
    Let's take a look at what our Designers have to share with us today.

    *******

    Heather Leopard

    I created this fun interactive 3D card that actually swings and flips to lay flat when you open it. Once I decorated my cake and topped it with candles made from different pieces of pattern paper, I stamped the Happy Birthday sentiment. Now I have a fun and unique card to give to someone special.

    Supplies:
    003941 Snag 'em Stamps "Happy Birthday"
    003931 Hello Cupcake Paper
    003934 Hello Cupcake Paper
    003935 Hello Cupcake Paper
    Close to My Heart Inks: Lagoon & Barn Red
    Silhouette CAMEO
    3d flip swing card birthday cake by Lori Whitlock


    Rebecca Keppel

    I used each of the Monster Mash Snag Em Stamps on this layout. I stamped each image on white cardstock with black ink, then colored them in with Spica and Copic markers. I cut out each of the images and popped some up with 3 dimensional adhesive. All of them got a coat of Glossy Accents on top to give them an epoxy look.


    I love using the Snag Em Stamps as embellishments on a layout. Since they are all the same size, it helps add design repetition to the layout. The Monster Mash characters were perfect accents to my "gang" of trick or treaters.

    Supplies Used: Monster Mash patterned papers, die cuts, layered journaling sticker and Snag Em Stamps

    Thursday, August 23, 2012

    Monster Mash Release Week - Day 4


    Welcome to Day 4 of our Monster Mash release party.

    Today we have Heather Leopard sharing her talents with us.

    *******
    My layout today focuses on that moment when kids get home from trick or treating and can't wait to look at what they got. My girls always run in and immediately dump their candy out to ooh and ahh over it. Here's my sweet "princess kitty witch" with all her loot.

    I distressed and layered coordinating paper and the journaling spot under my photo to frame it up. I topped off an accordion rosette with a cute little brad perched on a flower, which was punched from the small i-top punch.  The title and witch shoes die cuts are the perfect finish to the page.

    *******
    For my second project today, I thought it would be fun to stick with the "treat" theme and wrap up some candy in these cute little wrappers, which I cut with my CAMEO. I used the bat from the Monster Mash die-cuts for the cute face. I think these will be fun to send with my girls to give away to their friends at their school Halloween parties.


    *******

    Join us again tomorrow as we close this week off with a few more fabulous & stunning projects using the new Monster Mash collection.

    Wednesday, August 8, 2012

    Cheery Lynn Designs & Imaginisce Swap - Day 4


    We've got another great day of projects for you today as we head into Day 4 of our Blog Swap with Cheery Lynn Designs.


    Heather Leopard

    When I got my dies I knew I wanted to use the butterfly as the key focal point for my project. What better way than to use it on a card. Sure, it won't fit in an envelope, but I often use my card as part of the decorative packaging so I'm okay with that.

    I cut the die and just loved how intricate the details of it were but they were getting lost on the card so I cut a second butterfly out of coordinating blue paper and taped the back of it prior to removing it from the die. That kept it all intact. I adhered one behind the other and used my i-rock tool to add sparkle. Lastly, I cut decorative strips from the decorative edge die and finished it off with a chipboard sentiment, and more gems.

    Supplies: Makin' Waves 09317, 3915, 3919, Chipboard Stickers, Cheery Lynn Butterfly Die and Queen Anne's Lace Die, Mr Huey mist, i-rock and gems.


    Adora Concepcion

    I created this layout of one of my kids favorite store, homemade candy and ice cream store!!! How sweet is that!

    Here is a closer look at this Canadian Kaleidescope Doily and the Miniature Rose Dies.

    I added handmade buttons using the i-Top tool and small brad daddies.

    Supplies: Imaginisce (Hello Cupcake: Let's Party paper and sticker; Sole Sisters: Purse-onality; i-Top tool and brad daddies), Cheery Lynn Designs dies

    *******

    To make this week of inspiration even better
    we are going to add in a
    GIVEAWAY!!!

    Here's what you need to do in order to be entered into the random draw to win:
    • Leave a comment HERE (on our blog) on every post during this blog swap (Aug.5th-11th)
    • Leave a comment on the Cheery Lynn Designs blog posts all week (Aug 5th-11th)

    We will randomly select a winner to receive a
    package of the Makin' Waves collection
    (winner will be announced Sun., August 12th)

    Good luck everyone!
    And thanks for joining us today.

    Wednesday, July 25, 2012

    Christmas in July - Day 3

    Welcome back to Day 3 of our Release Party for the new Christmas collection!
    We've got many more incredible projects to share with you today so let's just get right to it!

    *******

    Regina Mangum


    Merry Christmas Santa Layout
    I created this layout for my little guy's first "successful" (i.e. no tears or screaming) visit to see Santa. I love the big, happy die-cuts in this collection, which helped me to use just a single photo of the big moment.


    Days 'Til Christmas Countdown Calendar
    The wonderful "B-sides" in this collection were the perfect patterns for this countdown calendar -- perfect complimentary colors and patterns for something a bit more elegant.

    The word "Christmas" is actually cut from one of the border sides of the paper and it was exactly what I was looking for to finish off my project.


    Heather Leopard


    Though some might think that celebrating Christmas in July is a bit too early, I actually really love it. It gets me into the mindset to start my planning. There are a few things I like to start thinking about early...Christmas dress attire and gifts for teachers and neighborhood pals. Thanks to Imaginisce, I've got a good head start...

    Mistletoe Earrings
    I'm always on the hunt for handmade jewelry. These earrings are the perfect accessory for a fun night in on Christmas Eve!

    I cut them from a pine cone file using my Silhouette CAMEO. My twist to them was using my Magni-top Magnet Earring Kit and a bit of twine to turn them into earrings. I made a coordinating box so that I can give them as a gift.


    Christmas Treat Bags
    Each year I try to think of something cute to give to the 15 kids who live on our cul-de-sac as well as to the teachers and administrative staff at my daughters' schools. This year I am going to give them homemade s'mores kits packaged neatly in this little gift tote.

    I used my CAMEO again to cut the file and then I used my i-Punch to punch holes in the inside baggie. I them threaded the ribbon through the baggie and the back of the gift bag, tying it and sealing the edges in a chevron cut using my i-Magicut. I'm pretty happy, it's only July and I know what we'll be giving out this year!


    Cari Locken

    I really enjoyed using the new Christmas Cheer collection to scrapbook layouts of our Christmas holidays from last year. The colors & patterns worked so well with my photos and the designs are super cute!


    "Tis the Season"

    I added some red Glam Rocks to the Christmas Tree die-cut & a small silver stud to the bell ornament. I also used some Foam Tape to add dimension to the title die-cut, "Tis the Season".


    "Be Jolly"
    I really had fun creating this layout for two reasons.


    I first of all wanted to bring one of the hottest trends into my layout - chevrons. I cut strips of patterned paper and then used my square punch along each strip (on both sides) to create the chevron design. I adhered all of these strips to a green cardstock piece.


    I then wanted to have fun with some snowflakes so I designed the placement of the snowflakes using the Cricut Craftroom software & the Graphically Speaking cartridge. I then cut it out using my Cricut Expression 2. I adhered patterned paper behind the cut out snowflakes and used some of the smaller snowflakes on the top of my layout & adhered with foam tape.

    I adhered some red Glam Rocks to the centers of the snowflakes for a bit of added bling & visual interest/color.


    Diana Fisher

    "Merry & Bright"
    I love the classic look to the Christmas Cheer collection. I especially liked the larger die cuts for the title and the ornaments. They really pop off the page and add fantastic depth to the layout.

    Birdhouse
    All of the papers coordinate so well in the Christmas Cheer collection. I love how the red, green, white and even the patterns are work flawlessly together.


    This little wooden birdhouse ornament was made using a few different pieces of the paper as well as the Clicut Retractable Pen Knife to help with fitting each piece perfectly on the sides of the birdhouse. I can't wait to hang this on my tree this year!


    *******


    GIVEAWAY TIME!!!

    We're going to Giveaway TWO collections of our new Christmas Cheer release!

    All you have to do is leave a comment on every post this week (Monday through Thursday) and let the Design Team know how they've inspired you with their holiday themed creations!
    (Winners will be announced Friday, July 27th)

    LinkWithin

    Related Posts with Thumbnails