Pages

Showing posts with label I-top. Show all posts

Monday, October 27, 2014

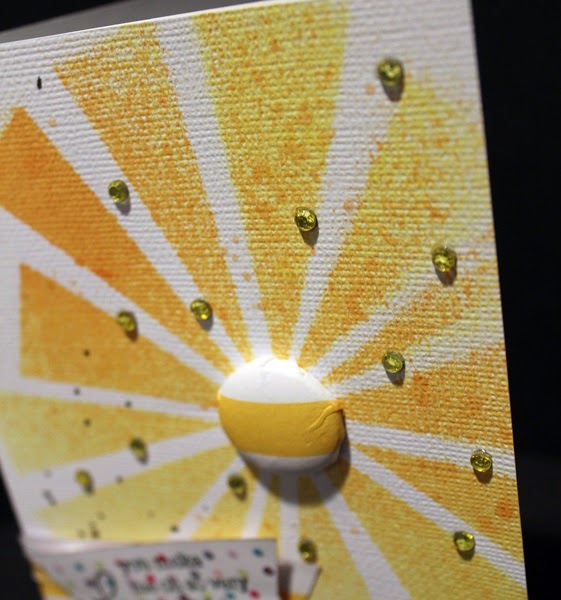
You make me so very happy!

Our design team has been creating some fabulous projects this past month and showcasing the various tools that Imaginisce has.  Today Lanette shares this great project using the i-top and i-rock tools!


"Happy"

Hello All Lanette here! Today I wanted to take a moment  to share  a quick little card using two of my favorite Imaginisce Tools. But first I wanted to let you know a bit about these tools.

First in no particular order is the I-Rock tool. With this too you can permanently affix rhinestones, jewels, pearls, or mirrors to paper, fabric, or even furniture to create a dazzling masterpiece! It's so easy! No need for messy glue. Each package includes one cordless heat setting tool. It truly rocks!

Next is the I Top with it you can transform an ordinary brad into a custom accent in an easy two step process. Just place your paper and blank brads and give a little squeeze.

Now lets take a peek at the card I created using these two fabulous tools!


Here you can see the dimension that the I-Top adds. 


And all the sparkle that the I-Rock adds.


Thanks so much for stopping by today!
-Lanette

 If you would like to find out more about all the fabulous tools Imaginisce has to over just hop on over to the Imaginisce Website


Supplies used:
Imaginisce Products: Pattern Paper -Welcome Spring Pattern Paper & Little Princess,  Rock tool & Rhinestones, I-Top & Brads.

American Crafts- Cardstock, Foam Dots, Mister Hueys Mist.

Wednesday, October 15, 2014

Little Princess Magnet Board

The Imaginisce i-Top is a fascinating tool and create so many fun projects.  Check out Becki's awesome project using the magnets that go along with the i-top.


Becki Adams

Little Princess Magnet Board
I love to have little premade gifts on hand for cousins and friends. I think that this magnet board will be a huge hit! 


I simply created a header out of patterned paper, gems, and diecuts. I then adhered it to the top of the piece of wood.


Then I added a few magnets made from patterned paper and i top magnet daddies.


I'm thrilled with how it turned out!
Thanks for visiting the Imaginisce blog.


Supplies used:
Imaginisce: Little Princess, (patterned paper, die cuts, gems)
Tools: i Top, i Top magnet, i Top large punch

Thursday, July 31, 2014

Giveaway Reminder!

If you missed it - this is just a reminder of the Giveaway that closes at the end of this week (that's tomorrow!!).  And we're pretty sure that you won't want to miss it!!!

Check out the details HERE on the post from last week.

We'll be giving away the i-Top tool and accessories to one lucky winner!!

So make sure to read the details of the giveaway and check back on Monday, August 4th to find out if you're the lucky winner!!!

Wednesday, July 30, 2014

Blossom with the i-Top tool

Have you tried out our i-top punches before?
These are the punches that go along with the i-top tool to create the brads.
Check out how Amanda used the punches on her layout below!!


"Blossom" layout

I have a confession to make, I had never used my I top tool before this assignment! I have 3 little ones, and my scrapping time is usually in spurts, and I thought oh, those must take forever to make, I don't have time for that...boy, was I wrong!! The I top tool, is so fun and easy to use, and it makes very sturdy brads! I loved how easy it was to punch them through my paper, no piercer needed ( because again, who has time for that!), and you can make custom brads to suit your needs!! 

For my project, I decided to have fun not only with the brad maker, BUT with the i top punches also! I used all 3 sizes, to create a fun background for my project!


I love the fun look of these punches, and it helped me to add some fun pattern and texture to this layout. Then in the "open spots" I added in a mix of my custom i top brads, wood veneer, and rhinestones.  I kept the rest of the embellishing to a minimum, just a few pieces layered here and there for even more interest.


Then to make my journaling and title really pop, I adhered a few of my custom brads clustered there, it really helps to draw your eye in!


I have a new love in the i top tool, and it quickly went to the top of my must use list!!! :)


Supply List:
Imaginisce: Patterned Paper (Welcome Spring); Rhinestones ( Welcome Spring) i-top tool and punches.
American Crafts: Cardstock

Tuesday, July 29, 2014

Perfect Vacation

Create a great layout with just a few layers of patterned paper, some brads and die cuts.  It's that simple!


Perfect Vacation

Hello!  It's Tracy here sharing my layout using the Perfect Vacation collection.  I layered pieces of the patterned paper along with two of the journaling pieces from the cut-apart page.


I also created my own embellishments using the I-Top tool.  This is such a neat tool because you can use your own patterned papers or images to create custom brads.  I used the patterned paper from the Perfect Vacation that has the geotags.  These brads are the 22 mm size.


The camera and arrow die cuts are from the Perfect Vacation die cut pack.  I added a few I-Rock gems in coordination colors.


Supplies:
Imaginisce: Perfect Vacation (patterned paper, die cuts), I-Rock, I-Top, Glam Rocks

Monday, July 28, 2014

Enjoy Life Canvas

Whoa!!!
Check out this stunning home decor canvas perfect for any room in your home!!  You could customize this to fit your own colour combinations, flower designs and sentiment.


Altered Canvas with Welcome Spring and the i-Top!

I think everyone should try an altered canvas at least once!  You can customize them anyway you like and they are fun to make.   Katrina here today, with a very flowery canvas and some step out photos of the i-Top tool in action!


My canvas measures 7in x 14in, so it wasn't convenient to cover it with paper, so I misted with a couple of different mist colors.  While they were still wet, I smoothed them out with a paper towel and came up with this peachy color.


Then the flower making began.  I wanted a variety of flowers, so I found a few different cut files for my Silhouette and went to work. 

The flowers needed centers, so this is where the i-Top tool came in handy! I could make coordinated centers for all my flowers in a few easy steps.

1. Punch out your center with the sized punched for your brad size.  Sit the brad top on the i-Top and then center your punched piece over the brad top.


2. Squeeze the i-Top tool, not too tightly, until the pink rubber cup has the brad top and punched piece pinched in it.  When releasing the tool, squeeze the cup to keep the brad top and center in the cup area.  You will then fold in the edges of the paper toward the center of the brad top.


3. Now, you will get the backing of the brad and place it on the same side that you started with the brad top.  It fits just perfectly on there.  Squeeze the handles together and this will seal your brad shut.  The brad will stay in the pink cup area until you manually take it out by moving the plastic cup up.  


I wanted to show that the brads are fun with pattern paper, but are also an elegant addition by just using cardstock as your brad paper.  

I arranged my flowers in diagonal corners to give some balance to the canvas, but each corner is a little different and has it's own touches.  


Also, to give your canvas dimension, layer multiple layers of foam adhesive behind your flowers and leaves.  This will give your canvas, not only some interest, but you will be able to tuck items in the space it creates.


Thanks for stopping by the Imaginisce blog today!  Have a great week!

Supplies:  
Imaginisce-Welcome Spring (12 x 12 pad, Die Cuts), My Baby (12x12 paper); i-Top and Brads
American Crafts-Cardstock, Heidi Swapp Mists

Thursday, July 17, 2014

Away We Go!

If you're looking for some ideas on how to scrapbook your travel/vacation pictures then this is a perfect layout to check out!! We love how Monique used the i-top brads to mark her destinations and points of travel.


"Away We Go"


Hi everyone!! Today I want to share a travel layout with you, for which I used my fabulous I-Top tool! I chose photos from our New York vacation where we stand on top of the Empire State Building. 


I decided to use the sheet with the world map from the Perfect Vacation collection and to create matching brads to indicate the place of departure, the place of our destination and a brad to link my photos to these places. 


I really love that the I-Top tool gives me the opportunity to create brads that exactly match my layout!!! Thank you so much for visiting Imaginisce’s blog today!


Supplies: 
Imaginisce: 12x12 paper pad, die-cuts, sticker stacker, die-cut tag pad (Perfect Vacation); Bazzill Basics: cardstock; Studio Calico: cork hearts, sequins; The Twinery: twine; K&Company: pen.
Tools: I-Top Brad Maker, I-Top paper punch 22mm, Brad Daddies 22mm; Aigger sewing machine; Tim Holtz: Tiny Attacher.

Tuesday, July 15, 2014

i-Top Work Out!!

Wow! Christine will gave her i-top tool a work-out on this fabulous layout!!
What a fun way to add visual interest and dimension to a page.


"Little Princess" layout

Sometimes I love to just look at the patterns on paper and see if something jumps out at me to play with.  That is what happened today!  I was drawn into the diamonds on the background paper and decided to make some I Top Brads to accent those and create a one of a kind layout!


I created some of the smaller 16 mm I Tops using a bright pink patterned paper to contrast the light aqua background.  I put those at the intersection parts of patterned paper.  I also added in some butterflies and gemstones to add a little variety!


To create the dimensional squares you see I punched out a 1 1/2" circle.  I then set a 1 inch square in the middle of it and folded up each side of the circle - creating a perfect square!  Super easy and really packs a punch!


Thanks so much for joining us today!  Can't wait to see what you are making with "Little Princess" and your I Top!

Supplies Used:
Imaginisce: Patterned Paper (Little Princess), Die Cut (Little Princess), Gems, I Top

Monday, September 16, 2013

Sunshine Fun with Mary Pat

What are your go-to tools? 
Punches?
Scissors for fussy cutting?
Die-cut machines?


Design Team member, Mary Pat Siehl, can't live without her i-rock and i-top Imaginisce tools. She loves them and she created this super cute layout using both of those tools.


Sunshine Fun

For my project I used two of my favorite tools- the I Rock and I Top.  I couldn't scrap without these two tools.  I love the I Top because brads are one of my favorite embellishments.  

For this project I used the small, medium and large brad daddies and I scattered them in on my project to create a visual triange on the layout.  


Then surrounding the brads I added some bling with my I Rock.  I also used the I Rock and Hot Rocks to add a bit of bling on my sun rays.  I love how it gives the layout a little something more!


supply list
paper-die cuts- imaginsice
I Rock
I Top
Brad Daddies
cardstock, tags- Core'dinations
Silhouette
twine- the stringery

Thursday, September 12, 2013

Stamp Storage

We're always in need of containers and storage items to hold all of our precious scrapbooking items/tools.
Design Team member Fleur Smith came up with a super cute idea to store her Snag'Em Stamps.
Check it out!


Snag  ‘em Stamp Holder
I love the Snag ‘em Stamps that come with each of the Imaginisce Collections and I have quite a few of them so I made this cute little holder for all of them.  


I also wanted a quick reference for all the stamps I have so I stamped the image on a tag cut from patterned paper and used a binder ring to bind them all together.  

Instead of adding a tag on the front to label the container I used the Itop and printed off a copy of the Imaginisce logo and a Snag ‘em Stamps image and turned them into brads and added them to front of the box.  Now all my stamps are in one place and sit on my desk within easy reach.


Supplies: Patterned Paper and stamps – Imaginisce, Ink – Versafine, Ribbon – May Arts, Die Cut Machine – Silhouette Cameo, Ring – Junkitz


Wednesday, September 11, 2013

"Fur-ever Friends" with Monique

We've got another great project to share with you today.
Design Team member Monique Liedtke created this stunning layout using the Good Dog collection and featured the use of the i-top tool.


One of my favorite Imaginisce collections is the “Good Dog” collection. I love the warm colors and all the super cute stickers and embellishments. For today I decided to use this collection for a layout about my 8 year old Cocker Spaniel. Except for the Good Dog papers and stickers I also created some brads with my I-Top tool. They provided the perfect finishing touch!

This is the layout I created: One Two Three Snap!


And here’s a photo of two of the brads I created:


Do you want to see how easy it is to create these brads with the I-Top? Here’s how I made them:

Step 1: Choose a size for your punches and brads. I used the 16 mm (small) and the 22 mm (medium).


Step 2: Place the punched out paper shape on top of the shell (I always use a glue dot to keep my paper shape in place, but you don’t have to) and place them on your tool.


Step 3: Squeeze your tool and release:


Step 4: Fold the paper tabs inside the shell.


Step 5: Place the brad base in the tool and squeeze until you hear a popping sound which means the brad clicked together.


And that’s it. Now you have the perfect – coordinating – brads!!


Thank you so much for letting me share! Hope you found this helpful, if you have any questions just let me know!

Supplies Used: Imaginisce (Good Dog: patterned paper, sticker stackers, chipboard stickers; Childhood Memories: ABC stickers; Brad Daddies).
Other Supplies used: Bazzill cardstock, Studio Calico: cork embellishments. Tools: Imaginisce I-Top tool, Silhouette Cameo, Aigger sewing machine


Tuesday, September 10, 2013

"A Great Adventure" with Diana

Today design team member Diana Fisher shares this super fun layout!


My family loves baseball. My son plays the game and we love to go to the local AAA games. The photo I wanted to document was from the last game we went to, and also the last game we'll attend for the season.

I often buy baseball embellishments, but for this project, I wanted to make my own. I used the i-top tool, the i-top punches and the magnet daddies (without the magnets) to make flat-backed 3-D baseballs for my layout.


After designing my page, I had a space for 1 large baseball and 2 small baseballs. Using the i-top punch, I made a white card stock piece and drew with red pen the seams for my baseball. Using the i-top, I assembled the baseball using the magnet daddy without the magnet in the middle. Then I put a foam adhesive dot on the back. I then adhered them to the page where I made space for my new baseball embellishments.


This would be so easy to do for soccer balls and basketballs, too. Maybe even a beach ball! Give it a try next time you have a sports layout or project!


Supplies: Imaginisce tools: i-top, i-top punch - large and small, magnet daddies (without the magnets) - large and small. Imaginisce papers: Childhood Memories (pattern paper, 3-D stickers, 12x12 sticker sheet), Outdoor Adventure: 3-D stickers, sequins, foam adhesive, Tombow adhesive dots runner, white mist, white card stock


What a great idea.
Thanks for tips Diana!

LinkWithin

Related Posts with Thumbnails