

Welcome back to Day 4 of our i-top Button feature!
So many great projects can be created with these tools and we love seeing what our Design Team come up. We're always left in awe at the creativity that people have!
Let's take a look at some more fabulous projects.
"Love This Moment"
Last October the 5 of us spent a wonderful week in Barcelona. Our hotel, which was situated right in the city centre, had a beautiful terrace on the roof and the view was so beautiful! Every day, right after breakfast we went straight up to the roof to enjoy the view. What a magnificent city this is!
I really loved to use the I-Top for my page. I've created both paper buttons and fabric buttons and love how they turned out. They are the perfect finishing touch for my page!


Supplies Used: Imaginisce (Love You More: patterned paper, sticker sheet and washi tape).
Other Supplies used: Bazzill cardstock, page from an old book.
Tools: Imaginisce I-Top, Silhouette Cameo, Aigger sewing machine
Do you know how super easy the I-Top tool is to use? Let me show you how.
Step 1: Gather your supplies: I-Top tool, I-Top buttons, Paper Punches and patterned paper:

Step 2: Choose the button size and the punch you need (I chose the medium size):
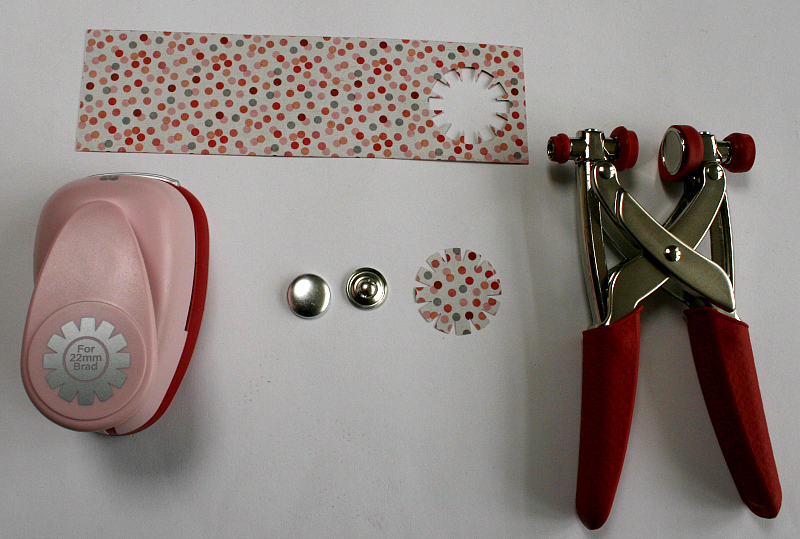
Step 3: Place the button shell on the smaller head like this:

Step 4: Place your punched out paper over the button shell and squeeze your tool and release again.

Step 5: Flip your tool over and push down all the paper tabs:

Step 6: Flip the tool back up and place the button base on the metal head like this:

Step 7: Squeeze the tool closed again until you hear a popping sound which means the button clicked together. And that’s it, you have a perfect button!

Now if you want to create a fabric button the way to do this is more or less the same, but there is a slight difference, have a look.
Step 8: Gather your supplies: a piece of fabric (I’m using a left-over piece from Ikea), the right button size and punch and template (I chose the medium size again):

Step 9: Cut a square piece of fabric the size of the template, about 2”x2”:

Step 10: Place the button shell on the smaller head of your tool (just like before) and place the piece of fabric over the button shell and squeeze the tool and release again:

Step 11: Trim down the excess of fabric a little. If you have thicker fabric you may want to trim it a bit more, but my fabric is rather thin.

Step 12: Push all the fabric ends down like this:

Step 13: Place the button base on the metal head (just like you did with the paper button) and again squeeze until you hear a popping sound so you know your button is ready!
And that’s it! Don’t you just love your self-made buttons?

Thank you so much for letting me share!
Supplies Used: Imaginisce (Love You More: patterned paper, sticker sheet and washi tape).
Other Supplies used: Bazzill cardstock, page from an old book.
Tools: Imaginisce I-Top, Silhouette Cameo, Aigger sewing machine
"XOXO" Card
It's always fun when you can make your own embellishment that matches your projects. That's why I think the I-Top tool is an awesome handy tool to have. It's really fast and easy to use. Here is a small project I created embellished with a matching handmade buttons.

Here is a closer look for you.

Here are the supplies I used to make my own buttons.

This is a little trick that works well for me, I use a double sided adhesive tape in the middle of the punch out paper that I will use to cover/design the button.

Then position the half part of the button in the middle. This will make it easier for the next step.

Make sure the heads (tool) are tighten before use, the heads will not line up together if they're not tight. Squezze the handle down to push the button inside the head.

Fold the paper inside as shown, then put the backing of the buttons using the tool smaller head, you will hear a small click once it's correctly place in position.

Open the rubber head to pull out the completed button.

Now it's ready for use. Fast and easy!!!

I used glue gun to attached it on my projects.

Supplies Used: Love You More Collection, I-Top Tool, I-Top Medium Buttons, I-Bond Tool.
Don't forget about our Giveaway!
If you love to cover buttons then you will love this prize!
We'd love to hear what you would create using the i-top tool and some accessories.
Just leave us a comment about what you'd create and you'll be automatically entered into the random drawing for an ...
i-top tool package!

(winner will be announced Fri., March 1st)
51 comments:
Having an I -op tool would take my sewing and scrapping projects to a new level. I often avoid buttons because I can't find the "just right" one. I-top would solve that issue.
Loved the tutorials today thanks! I'm still thinking jewelry would be fun to make with this tool. Still want to use this as my go-to covered button tool for sewing as well.
Oh wow love this tool...so many amazing creations...
awesome ladies!!
I'd love to make some buttons to add to my rosettes! Also I often don't bother with keeping my dots in die cutting...this would be great for dotting my i-s. :D TFS...great projects.
I am loving seeing all that can be created using this tool!
I am so in love with the i-top tool. It certainly would take my cards and layouts to another level. Awesome tutorials.
Wow, these projects are terrific. I would used it on my cards and in my Smash book.
Fabulous projects today - and a super tutorial that will help in making projects easier. I'd love to use it for both mysewing projects and for crafting. Lovbe the button centers on the flowers made with it.
I just love your projects. I tried out your tool at the CHA, and it is so easy, and makes such great brads. I need one. I would love to make some for cards. I make a lot of cards.
This would be just great to add pop to cards and embellishing hair ribbons.....
Oh wow I would love one of these...I could make some wonderful buttons for my scrapbook pages!
Would love this to make my own flair badges
Oh my gosh...so many hints today on how to use this tool. I want it so very much! If I can't win it then I will be on my way to Michaels with my coupon. I just hope that I can make my buttons as smooth looking as today's designers did. Thanks for the chance to win.
I love it,I'd be redoing buttons on clothes and making matching buttons for scrap book pages.the designers have given many ideas,TY team!
I love the idea of using the brads as the letter "O"!! So fun!! Thanks for sharing!
I am a tool fanatic. I just love all the new tools. This would be so helpful, so that all my cards and scrapbook layouts would have matching buttons without having to purchase so many different colors of buttons or the ones that come with a set. I'm super picky about matching. This tool would be so up my alley with my current Easter cards I'm working on. I don't have any buttons to match and would love to make some with all the cute papers I have. Thanks so much!
wow, even burlap? NICE. I'd like to be able to make burlap and canvas ones for an apron.
I love the layout and card, thanks for sharing! I would make buttons for layouts, cards and a mini album.
Oh wow....These are so pretty. I had no idea you could make these. Now I really want one. If I had one I would make buttons for my cards, layouts, Tags, and ribbon to add to my projects. Thanks for sharing this with us. I have learned so much today.
I'm going to have to use some fabric to make my buttons. I've only used paper so far, so thanks for the ideas.
Carla from Utah
Adora, Great detailed shots of how easy the i-top tool is to make buttons and brads!
so snappy. Great cards and examples too! :)
If I had a tool like this I would have buttons on everything.
I remember covering buttons with fabric when I was a teenager. It was hard to do. I don't sew much anymore but I scrapbook and make cards. I would love to have an i-top to make button decorations. Hope I win!
Cool tutorial! I would make embellishments for my students to use on their easel Mother's Day cards.
This tool is so neat! I would use it to add prettiness to my scrapbooking pages. Thanks for the chance to win :)
I would love to create hair accessories for my granddaughter.
This would be so great to make flower centers and cute buttons for other home decor projects!
This would make great matching buttons for my card making.
I make a ton of 3d stuff and often don't have just the right embellishment.. I can think of so many ways to use these tools but making thing I think I wish they would make.. tops the list..Thanks for the chance to win these great tools!
Earrings are one project I would want to finish. I strated making several pairs, but got tired of making buttons by hand.
twilson107 at cox.net
An easier question to answer would be where would I not use the tool! I want to use the burlap covered button on a mixed media product I am working on. I love the idea of using the itool for flower centers on cards, for the letter O in titles on my scrapbook pages and I want to find more creative ways to use them in my art journals! I do hope I win! Thank you for the opportunity!
Cute burlap buttons! Could you use it to make magnets?
I love love love this tool! I would use covered buttons in both garment sewing and art dollls
id use it to make everything from buttons on clothes and home decor to scrapbooks and all other paper crafts to hair bows :) thanks for the chance
-jamie
babyblueangel_30@yahoo.com
This tool looks like so much fun!
I would of course use it for my scrapbook pages - but I have some home decor ideas swirling around in my mind right now!!
Shelly S
oh wow what a nice toollll!!!! i like to have it! i would had some on all my projet with my flower or my tags or.... .i tink i would put it on a multitude of projet!!! Just love it! i would show it to all my friends!!
Great projects. I would use this tool to make hair barrettes.
Love the layout and card today. The layout is adorable. What would I make? Layouts and cards of course.
Oh my, what a cool tool I would love to make my own brads to match my projects.
great projects today! Hope I win so I can make these cute buttons!
I would just love to have some fun, something whimsical and spring-y!
love the layout and the card is sweet!! i'd make cards and layouts using it for sure! thanks!
Great tutorial! I would love to use the I-Top tool To embellish my layouts and cards! It would be the best looking embellishment on the page! Thank You for the opportunity to win this great tool!
Fabulous layout! LOVE the card!!! I would love to make some fun wrapped buttons. This is such an awesome tool!!!
love the layout and card. the layout has great layering and the buttons add some texture and dimension. like the buttons for the O's. thanks for sharing and chance to win. would use the prize to create pages for my babys scrapbook.
I've been so busy this week and have peeked in when I had the time via my tablet. I have so enjoyed the design team projects. I would love to be able to crochet a coffee cup holder for my husband, buttons for my layouts, cards, and a crochet a head band for winter warmth with my ears while out working on the ranch. So many wonderful ideas running through my mind! Thank you to the design team!
I love the versatility of this tool. So many great things to create. I'd make a pillow with a custom button pattern first.
oh wow, so many possibillities, I need this to put in the middle of my flowers. Too cute!! So much fun!!
That lo is lovely, I need an i-top to make my projects look beautiful and unique!!!
what fun it would be to make buttons that coordinate with your project.
Post a Comment