Pages

Showing posts with label 1 product 2 ways. Show all posts

Wednesday, April 11, 2012

1 Product 2 ways


We challenged our designers to use the i-top punches
in 2 different ways and create 2 projects in the process.

Today, designer Tiffany Hood will be sharing some terrific projects with us.
She came up with some fabulous & creative ideas so let's check them out!

*******

The I-Top punches are so versatile. Not only can you use them for making items for the I-Top, but you can also use them alone to make flowers, suns, gears, and other shapes for your projects.


Project #1
Here I used a punch to make the sun on this party invitation card.

I also used the punch to make the center of the sun using a 16mm brad daddy.


Project #2
On this card I used all four sizes of punches to create 3D flowers.

By using several sizes, you get the effect of a real flower.

********
Here's a quick tutorial to show you how you can make these flowers at home.


1. First, cut a straight line between two of the "petals" in the shape to the center of the "flower".

2. Place a strong adhesive like Sticky Strip or Tacky Tape on a petal next to the cut line.

3. Overlap two or more "petals" and adhere. Overlapping them gives the 3D effect.

4. Now your shape is starting to look like a flower

5. To add some more dimension to the flower, you can ink the edges to make them stand out

Repeat the process with more sizes, and layer several flowers on top of each other with the smaller sizes toward the top.
Punch a 16mm shape to use as the flower's center using a small brad daddy.

*******
Thanks so much Tiffany! Those are gorgeous cards.

Now don't forget ... we would love to see what you create and we want to challenge you to create something using the i-top punches in different ways. Then feel free to share your project with us on our Facebook page. We'd love to see it!

Tuesday, March 27, 2012

1 product 2 ways


Today we'd like to share with you several different ways in which you can use our Snag'em Stamps. They are so versatile and sometimes we just forget how easy & simple they are to use!


Abby used the Circle Frame Snag 'em Stamp from out Bon Voyage collection.

Project #1
"I was needing a small gift box that was a bit on the masculine side so I decided to create this box and topped it with a bow/flower made from the circle frame stamp, then added an extra large I-top brad with burlap."


Supplies: Imaginisce (Bon Voyage papers & Snag 'em Stamp (Frame circle), i-top tool, extra large brad daddie, i-magicut ribbon cutter); Gold & Navy ribbon, raw box

Project #2
I also used the circle frame stamp as an accent to my card - rather than using it as a sentiment/journaling spot.

Supplies: Imaginisce (Bon Voyage paper, Snag'em Stamp (circle frame), Sticker Stackers, die-cuts); twine, tiny alphabets, cardstock


Diana used the Hibiscus Snag 'em Stamp from the Makin' Waves collection.
Project #1:
"I used the Hibiscus Snag 'em Stamp from the Makin Waves collection for my 2Ways projects. For the first card, I stamped the stamp as a pattern on a white card and then heat embossed with white embossing powder. Using distressed inks, I then applied the burnt orange coloring to the background, making a bold pattern for the card."

Supplies: Imaginisce (Snag 'em Stamp (Hibiscus from Makin' Waves collection), Happy Harvest paper); distressing ink, white embossing powder, button, kraft cardstock, ribbon, 'hello' sentiment stamp


Project #2:
For the second card, I punched a hole in the card to place the colored-in, singled out flower from the stamp. Remember, you don't always have to use the whole stamp. Singling outportions of a stamp can add a neat effect to any project. The clouds add dimension to the all-white card front, allowing for focus on the sentiment and flower.
Supplies: Imaginisce (Snag 'em stamp: Hibiscus from Makin' Waves collection), Fiskars Cloud punch, Nestabilities oval die, copic markers, rub-on sentiment, seam binding ribbon


The possibilities for using our Snag 'em Stamps is truly endless and we hope that you've been inspired to use them after seeing some of these ideas and beautiful projects today.

Tuesday, February 21, 2012

1 Product 2 ways

Today we are sharing with you another new monthly idea that
we've asked our Design Team to take part in.

We wanted to challenge them to use one Imaginisce product in 2 different ways and think outside of the box a bit ... which for some of us, isn't always easy!

So today we've got 3 designers who are taking part in the challenge of using our Roly Rosies in 2 different ways. Let's see what they've come up!


Project #1: Flower Frame

"I made this frame using the Roly Rosies-Paper. I wanted to dress up the flowers a bit and possibly use them in a different way. I put the flowers together using the Petal Roller and then added a bit of "glam" to them! How did I do this? Diamond Dust! Love that stuff!! I simply put glue on the edges of the flower petals and then dipped the flower right into the container of Diamond Dust and voila ... glamorous! I did this with all of my Roly Rosies. I then took one of the Roly Rosies wound it around the body of the Petal Roller then stretched it out and cut it in half length-wise (see picture #3 below). I added the flowers on my frame and some Crystal Hot Rocks."


Supplies: Imaginisce (Hot Rocks: crystal, Bon Voyage (papers), Roly Roises, petal roller, i-rock tool); Diamond Dust; Cardstock (Bazzill Basics); Wood Frame


Project #2: "Canvas Flower Bag"

"I had this canvas bag in my closet and thought it could use a little dressing up. These lovely flowers are the Fabric Roly Rosies. I used the Petal Roller to roll them up, glued them together using the i-bond and then glued them to the canvas bag. I added an extra touch to the flowers by sticking some Fashion Flowers in the center glueing them in and adding some Crystal Hot Rocks to the very middle of the flower. I then adhered an i-rock motif around the flowers using the i-rock mini iron. I did cut the motif up so I could place it on certain places around the flowers. Now, this canvas bag has a little flowery fun!"


Supplies: Imaginisce (Roly Rosies: fabric, i-rock Motif, Fashion Flowers, Hot Rocks (crystal), i-rock, i-bond, i-rock mini iron); Canvas bag


Project #1: "Happy Birthday" tag

For this stunning tag Shellye used the Neutral Roly Rosies, assembled them together and layered them onto a gift tag.

Supplies: Imaginisce (Roly Roises: neutral), petal roller, i-bond); flat backed pearls; paper leaves (Recollections, Michael's); rub-on sentiment (Basic Grey); misc. ribbon & string; 2 scalloped tags (Stampin' Up)


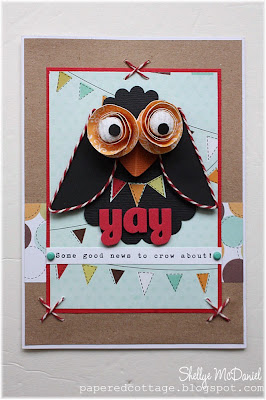
Project #2: "Something to Crow About" card

How adorable is this??
Shellye used the Roly Rosies (Brights) for the eyes of the crow! Genius!

"Punch large scallop, small scallop and circle from black cardstock. Cut circle in half (trimming as desired for wings). Punch heart from orange cardstock; fold in half. Assemble together as shown in photo. Cut small pieces of banner from Birthday Bash paper; glue to front of body. Glue baker's twine around the wings; attach with foam dots to body. With hybrid Petal Roller roll the Rolie Rosies as shown on package instructions. Trim down the size of the finished Rolie Rosies as desired (I cut mine down just a little bit). Add corduroy brads to center of Rolie Rosies and top with a small punched black dot (or use buttons, poms, etc); glue to head of crow as you like. Assemble the remainder of your card as desired."

Supplies: Imaginisce (Birthday Bash papers, Rolie Rosies); Cardstock; 5x7 premade card; corduroy brads; Thickers sticker letters; Baker's Twine; computer generated sentiment (Courier New Font); mini brads; large & small scallop punches; 1.5" heart punch; 2" circle punch


Project #2: Layout

"I am in love with the Roly Rosies Fabric/Papers! I love that I don't have to do any cutting to create these flowers plus rolling them is super easy. I think that the Imaginisce Petal Roller is brilliant, one of my favorite tools for sure!

I sprayed the Roly Rosies with glimmer mist for coloring and used it as is (flat) on my layout. Using a darker background makes the color and texture on my paper 'pop'."


Project #2: Friends Forever card
"I used the same coloring techinque (with mists). I embellished my card with a rolled Roly Rosies and one flat. I think that the polka dot print on the background paper is a great match with the Roly Rosies-text fabric."


If you have other ideas of how to use these Roly Rosies we'd love to hear about them & see them. Feel free to post them on our Facebook Page or comment here & leave us a link to your creations.

Please join us tomorrow for another new monthly DT challenge.

LinkWithin

Related Posts with Thumbnails