Pages

Showing posts with label Cricut. Show all posts

Tuesday, August 9, 2011

Birthday Mini Album Fun!

Greetings to you from Rhonda Van Ginkel!

I'm so excited to share with you a little mini album that I created for our son's third birthday.

I used to feel slightly intimidated to take on a mini album, but don't ask me why! Now they are now one of my favorite projects to do. Maybe it's the sense of accomplishment, or just the personal satisfaction of creating a book of sorts.

Whatever "it" is, they are worth every creative moment spent!

This project was created using the super fun Imaginisce Birthday Bash line, my Cricut Expression and "Sweet Treats" cartridge. The base album is an MDF Cupcake Mini made by our friends at Kaisercraft. Without further delay, let me show you the sweet side of this mini!
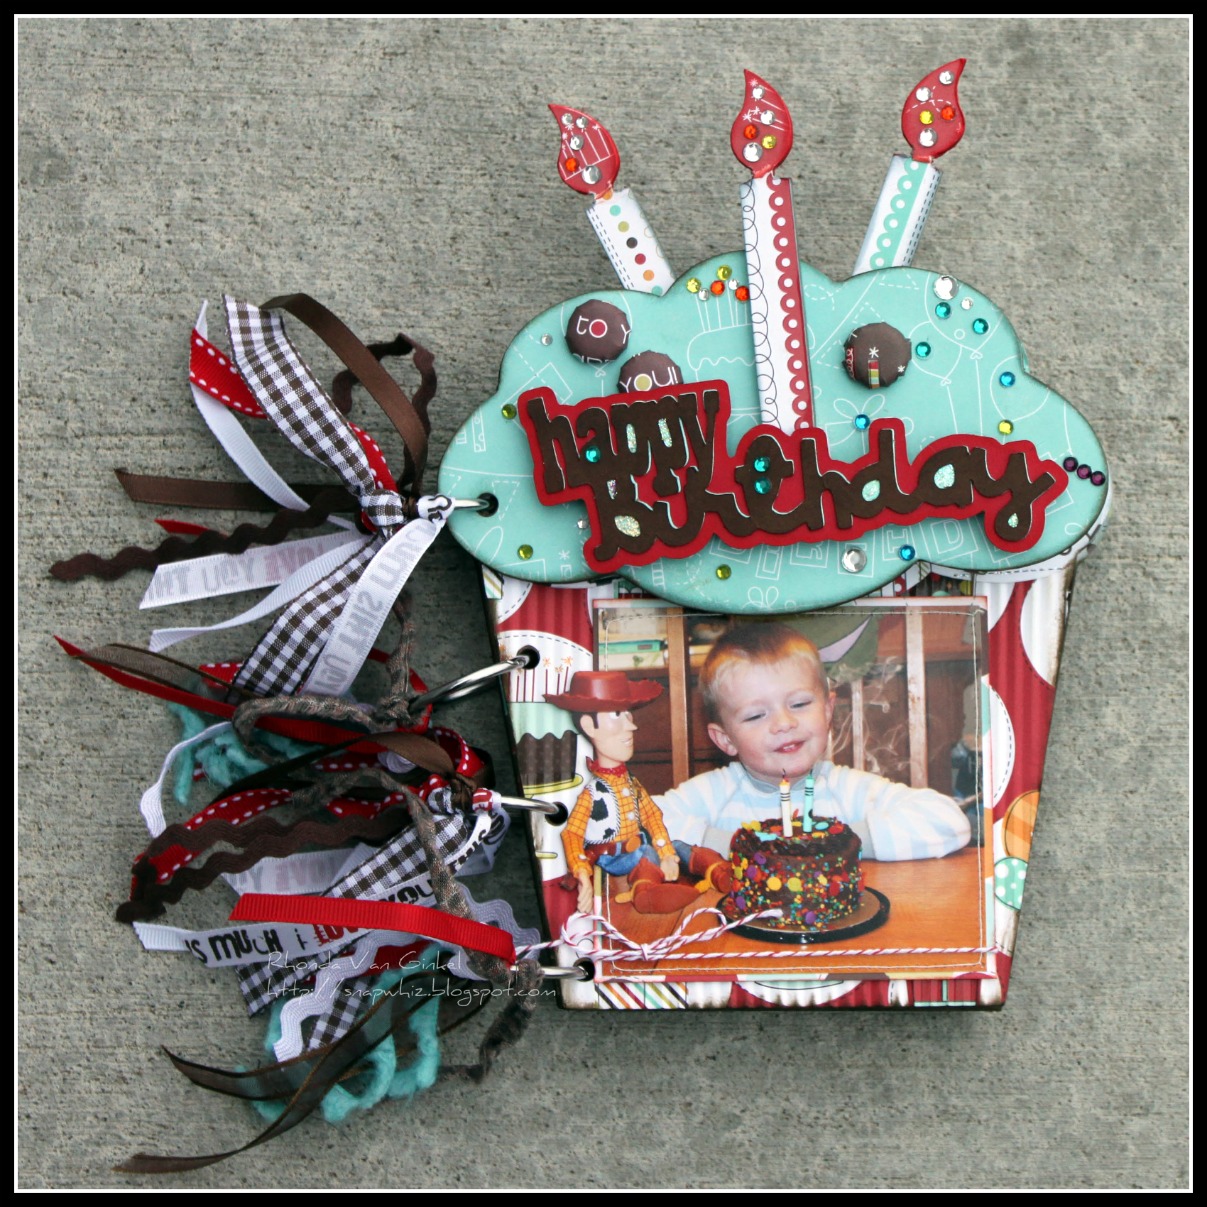
I used my handy dandy crimper for the front page to bring the cupcake feel to life. You'll notice the little bit of silhouette cutting of my photo to draw a little attention to Woody. Some i-Rock gems and i-Top brads were the perfect extra little touches to help complete my title. Personally, I love the gems on the candle flames quite a bit too.
I used the little rocket shape and placed it on foam dots to help disguise my candles. The title banner was cut out and there is a tab for the hidden journaling pocket.
Fortunately, I was able to capture several fun pictures on this day. You can see the boys were pretty pleased that Daddy brought home some breakfast birthday cake! (Yes, he did blow out all of his candles too!) I used a few tickets to tuck behind the photo to journal on for each of the boys.
May all your wishes come true! This page is subtle, but if you look closer, you'll see I used a punch and then filled in the holes with some Ranger Enamel Accents in white. This birthday for him was all about Toy Story!

The next few pages are some of my favorites, just because it really captured his super silly side so well. He had me almost in tears that morning, it was very funny!!!

Sometimes the best fun is the simple stuff, no? After opening his gifts, what did he go and play with? he he!!! I wanted to capture all of these moments that are part of his personality as he turned 3 years old.

On my back cover, I included a photo from his big party. I chose to do a little silhouette cutting on one of his gift photos to help simulate the shape of the cupcake.

For this mini I kept the interior pages pretty basic and used texture and dimension mostly on the cover. Since this is for our son, I wanted him to be able to flip through the pages easily.

Hopefully you enjoyed the album and perhaps I've even inspired you to take on a mini album project or two! Go for it and especially dig into those fun Imaginisce products and have fun with it!!! Have a fabulous day!

Friday, May 20, 2011

Click It With Cricut: May Flowers

April showers bring May flowers
So far this month, we've seen an abundance of flowers by way of our Roly Rosie release party.  But we aren't finished yet!  Today our talented design team duo Aphra and Heather have created two more fabulous flower projects using Imaginisce papers and the Cricut. 
Thanks Card
 by Aphra Bolyer

 
This stunning layered flower was cut with the Cricut Mother's Day Bouquet cartridge.  Here are the supplies and cuts that you'll need.
Supplies:  Princess Posies paper, Mirror Mirror paper, Cherry Lemonade paper, Just Peachy paper, 4.5" x 4.5" white card base, small white tag, yellow mini alphas, yellow button, yellow twine, foam adhesive dots, and chalk.
Cuts:     2 - 2" < leaf 7 >; 3" < flower 3 >; 2.5" < flower 5 >; 2.25" < flower 1 >; 2" < flowr 25 >; 2" < flower 2 >.
Flower Window Box
The amazing flowers in this planter box and the beautiful butterfly perched on the grass were cut using the Cricut Lite Live Simply cartridge.

Supplies:  Garden Party collection: Darling Dahlias, Blossoms of Blue, Brambleberry Blossoms, Wild Flowers, Rows of Posies; Pink Cardstock; Roly Rosies - Warm flowers and Petal Roller to roll the flowers AND the grass; i-top, small brad daddy; i-bond, i-rock and glam rocks; small box with foam insert; scissors to cut the grass; dowel to glue flowers to so they stand upright and don't flop over. 

Cuts:     2 - 4" < flower3 >; 1 - 4" < flower5 >; 1 - 4" < flower2 >; 2 - 3" < bttrfly6 >; Cut the same flowers and the butterfly again in coordinating colors so you can interchange the layers and stack them on top of each other.

Directions:
  1. Cover the outside of the box with pattern paper that will be used sparingly in the rest of the project.
  2. Cut strips of the Darling Dahlias green paper and then cut it in small fringe strips, leaving it intact at the bottom. Use your petal roller to roll the strips down. This will be your grass.  Adhere to the inside of the box.
  3. Cover the foam with Darling Dahlias paper to resemble grass.
  4. Lay your cut flowers out to determine placement of your flowers and color combos.
  5. Roll some roly rosies or make some brads using your i-top to attach to the flowers as centers.
  6. Adhere each flower together, seperately. Add the tiny dowel to the back of them with your i-bond glue gun, making sure to leave part of the dowel sticking out at the bottom. BTW, I didn't have a dowel so I used sticks from outside.  It's a flower planter afterall. ;)
  7. Poke holes into the foam and insert the flowers on the dowels. Make them varying heights.
  8. Roll 3 small roly rosies and set aside.
  9. Cut 3 extra stems and attach to the roly rosies you set aside. Add a dowel and stick the little flowers into the foam.
  10. Assmenble the butterfly with the solid pink and pattern paper. Add some i-rock bling to the antennae. Perch the butterfly on the grass.
  11. Stand back and admire. :)
Thankyou Aphra and Heather for sharing your gorgeous projects!

GIVEAWAY
Well have we got a giveaway for you today!
We have not one, not two, not even three - would you believe we have a grand total of EIGHT 3-month trial memberships to the member only Cricut Circle. Who's excited?
Okay, you'd better get your running shoes on because we are going to make you work a little for your prize today seeing as we are being soooo generous!

1. Pop over to Aphra's blog HERE and tell her how much you loved her project, don't forget to become a follower.
2. Pop over to Heather's blog HERE and tell her how much you loved her project, don't forget to become a follower.
3. Finally, come back and leave a message telling us what collection we will be releasing next week... hint, you might need a bag of marshmallows.

Winners will be announced at the end of the week!

Wednesday, March 2, 2011

Click It With Cricut


Made for Each Other
Don't you just love how you can find a Cricut cartridge for any Imaginisce project you are working on? No matter what the project you can find the perfect cut to pair up and give it that special touch.

In the spirit of Spring which is quickly approaching, Keely and I (Pinky) decided to shake off the winter blues and spruce things up with some Garden Party and our Cricut Cartridges!

Keely created this very spring inspired dress form using the following Cricut cartridges:
Sentimentals, Storybook, and George & Basic Shapes
Doesn't it make you want to don that pretty spring dress and run through a field of flowers? Ok maybe it's just me, but I am completely in awe!


Cricut Altered Paper Mache Dress Form
by Keely Yowler
• Paint dress form using cream craft paint. Pat on paint with dry washcloth for aged look.
• Paint wooden candle holder with tan craft paint.
• Using Cricut cartridge Storybook, cut 1 <heart> at 1 1/2 inches. Ink edges with distress ink. Adhere to center of dress form chest.
• Using Cricut cartridge George and Basic Shapes, cut 60 <heart1> at ¾ inches. Ink edges with distress ink. Adhere to upper portion of dress form.

• Using Cricut cartridge George and Basic Shapes, cut 100 <circle> at 1 ½ inches. Ink edges with distress ink. Roll each circle in cones shape and glue edge. Adhere to dress form, working from bottom to top.
• Assemble flower layers, attach with brad, and adhere to waist of dress form.
• Form hat with crocheted doily, flowers, and brad. Adhere to top of dress form.
• Adhere strand of pearls to neck of dress form
• Cut 2 pieces of tulle at 7 inches each. Tie together in center. Adhere to back center of dress form. Adhere roly rose, punched leaf, and decorative berry to center of tulle.
• Cut 1 piece of tulle at 10 inches. Tie around wooden candlestick. Adhere jewel to center.


To create postcard:
• Using Cricut cartridge Sentimentals, cut 1 <postcard> at 3 ½ inches, 1 <postcard> layer at 3 ½ inches, 1 <scissor3> at 4 inches. • Using Cricut cartridge, George and Basic Shapes, cut 3 <heart1> at ¾ inches.
• Ink edges with distress ink.
• Assemble as shown, adding Imaginisce Garden Party diecut.
• Adhere to bottom of candlestick.

Cricut Sweet Surprise Gift Card


To create gift card:
• Using Cricut cartridge, Sentimentals, cut 1“ <label 1> at 6 inches, 1 <label1> layer at 6 inches, 1 <swallow> at 3 inches.
• Ink edges with distress ink.
• Assemble as shown, adding Imaginisce “Garden Party” diecuts.
• Write, “I love you”, with black pen.

Supplies:
- Imaginisce Garden Party collection
- Cricut Cartridges: Storybook, Sentimentals, George and Basic Shapes
- Cardstock
- Paper mache dress form wooden candlestick
- Ranger distress ink
- White tulle
- Leaf Punch
- Craft Pearl strand
- Craft crotchet doily
- Decorative jewel
- Black journal pen
- Cream or tan craft paint

You will find more pictures and great ideas on Keely's blog
Be sure to stop by and say hello!


Beautiful Spring
Pinky created this Spring Wall Hanging
using the
Cricut Cartridge:
Home Decor


Cricut Spring Wall Hanging
by Pinky Hobbs
• Using Cricut Home Decor Cartridge and Garden Party papers cut 1 Die Cut Shape of each in 5", 4" and 3.9", then layer using Glue Arts 3D glue.
• Using Cricut Home Decor Cartridge and Garden Party paper cut 1 dragonfly shape in 2.5", then in green cardstock cut 1 shadow for dragonfly in same 2.5".
• Using i-bond & Roly Posies and Pop Up Posies layer posies and add charm to center.
• Using i-bond adhere posies and dragonfly to Wall Hanging
• Brush on pink paint above and below title.
• Adhere ric rac and green bow.
• Adhere SPRING title and apply glitter glue. Allow to dry then adhere ric rac as hanger.

Supplies:
- Cricut cartridges "Home Decor"
- Assorted Ribbons
- Chipboard Alphabets
- Green Cardstock
- Folk Art Pink Paint
- Glue Arts 3D Combo Pac
You can find more pictures and many more ideas on Pinky's blog right here.

We hope you enjoyed our
Cricut projects today!
And to make it more exciting we are giving away a brand new Cricut cartridge!
The amazingly useful SIMPLY SWEET cartridge!~

We love to make our fans HAPPY!
Leave a comment right here, go hit up Keely & Pinky's blog
&
and you will be entered to win this amazing cartridge!!
If you already have it, it would make an awesome scrappy gift for a friend!!
Enter now and pass the word along!!!

Keely and I hope you enjoyed this post as much as we enjoyed making it!

Wednesday, February 16, 2011

Click it with Cricut


Made for Each Other
Don't you just love it when you are working with a collection of papers and embellishments and there is a PERFECT Cricut cartridge to complement the theme? It's like the stars align, the gods smile upon us or that serendipitous moment we all wait for suddenly appears.

This is exactly how Beth Moore and I (Liz Qualman) felt about our assignment to kick off Imaginisce's official Click it with Cricut Feature. Our team of designers can't wait to show our fans how Imaginisce and Cricut are totally meant to be together by pushing the creative boundaries with Imaginisce's expertise in paper and embellishments and Cricut's expertise in technology and die cutting. Beth and I both knew we had the perfect cartridges to go along with the brand new Berrylicious collection. Below are a few of our projects....
Created by Beth Moore
Beth completely rocked the Berry Sweet sentiment with her delicious and juicy strawberry card. The details are divine and the tiny Glam Rock seeds are about the cutest thing in the world.

Cricut Preserves Cartridge and instructions
  • Cut 2<strwbry1> at 2 inches with all layers.
  • Assemble Layers and then adhere one strawberry on top of the other with pop dots.
  • Adhere black Hot Rocks to strawberries with I-Rock tool.
  • ...Cut 1 <tag><strwb2-s> in pink and emboss
  • Cut 1 <tag><lemon> in white and adhere to back of pink tag.
  • Thread ribbon through tag hole and tie a bow with Baker's Twine.
  • Adhere to card as shown.
Supplies Used:
Imaginise Berrylicious Collection
Sewing Machine and White Thread
Cardstock from Papertrey Ink
Cuttlebug Embossing Folder
Created by Beth Moore
Are you completely in love with Beth's Life's A Garden Card? Those little boots are absolutely adorable and perfectly die cut by Beth's Cricut. And guess what??? Beth made this a pop up card!

Cricut Plantin Schoolbook Cartridge and instructions
  • Cut 3 <grass> Note: adjust size in Gypsy or Design Studio to fit card front) 0.85 x 5 1/2 inches.
  • Hand cut small pieces from one grass to adhere to hoe and water can.
  • Adhere all assembled cuts to card as shown.

  • Punch butterfly and add glam rocks with I-Rock.
Supplies:
Imaginisce Berrylicious Collection
Imaginisce Glam Rocks
Imaginisce I-Rock Tool
Martha Stewart Royal Butterfly punch
Papertrey Ink Cardstock
Ranger Ink
Created by Beth Moore
Inside Life's a Garden Pop-up Card
Cricut Freshly Picked Cartridge
  • Cut 1 <gloves2> at 2 inches with all layers and assemble
  • ...Cut 1 <hat1> at 2 inches with all layers and assemble
  • Cut 1<hoe> at 3 3/4 inches with all layers and assemble. Hand cut brown cardstock to resemble dirt and adhere to blade of hoe.
  • Cut 1 <whlbrl> at 3 3/4 inches with all layers and assemble.
  • Cut 1 <wtrcan> at 2 inches with all layers and assemble.
Created by Liz Qualman
Berrylicious was the perfect collection to show off these fun, fruity cards to tell someone you are thinking about them. The white background with a simple stitched border was intended to keep the fruity die cuts front and center and in the spotlight.
Created by Liz Qualman
Cricut Cherry Limeade Cartridge and Instruction
  • Cut <lime> 3" for the base
  • Cut <lime layer> 3" for the top
  • Cut white cardstock base 5.5" x 11"
  • Stitch simple square border .5" from the edge
  • Add cardstock die cut straberry with pop dots
  • Add the chipboard Squeeze Me sentiment
  • Adhere i-rock Mirror Glam Rocks for extra fun
Supplies:
Imaginisce Berrylicious collection
Imaginisce i-rock
White Cardstock
Rust colored floss
pop dots
tape runner

Created by Liz Qualman
Cricut Cherry Limeade Cartridge and Instruction
  • Cut <cherry> 4" for the base
  • Cut <cherry layer> 4" for the top
  • Cut white cardstock base 5.5" x 11"
  • Stitch simple square border .5" from the edge
  • Adhere cherries with pop dots
  • Add the sticker stacker journal spot and rub-on
  • Adhere i-rock Mirror Glam Rocks for extra fun
Supplies:
Imaginisce Berrylicious collection
Imaginisce i-rock
white Cardstock
rust colored floss
pop dots
tape runner
rub-on sentiment


We want to thank you for leaving us a comment today, because we always appreciate your encouragement and insight. However, it wouldn't be right if we didn't choose one lucky individual to receive a new cartridge of their very own. How about the Cricut Birthday Bash cartridge just for leaving us some love. We will announce a winner on Friday.

Please be sure to check back next week when we officially kick off our Berrylicious Release Party. You cannot believe what the design team has been cooking up with this fresh, juicy and sunny collection.

Friday, December 3, 2010

12 Days of Christmas - Day 2

Happy Friday!

It's Erin Bassett in today sharing with you how to create this holiday wreath.


I originally got the idea after seeing a beautiful wreath Charity Hassel made using the same technique and I thought it would be perfect for this project.

Here's the supplies you'll need:
  • i-top and a small (16mm) brad daddie
  • 3 sheets of double sided patterned paper (I used two sheets of"Peppermint Stick" and one sheet of "Swirly Snowflakes" from the Imaginisce Cottage Christmas line.)
  • Imaginisce "Season Greeting" rub-on words from the Cottage Christmas line
  • 2" scrap of red felt
  • 8" chipboard circle
  • ribbon
  • doily
  • baker's twine
  • Glimmer Mist - if desired ( I sprayed my wreath with a light coat of "Marshmallow")
  • "leaves"( I cut two petals off of the poinsettia flower from the Imaginisce Polar Expressions line, but you could always cut them out of scraps of paper or felt.)
Ok, get started by cutting/punching all the 1 ½" circles that you'll need out of two pieces of "Peppermint Stick" patterned paper....you're going to need a lot of them! I used my Cricut to cut out 49 of them per sheet of paper, but you can punch them by hand if you don't have a die-cut machine.


Next, fold each circle like the photo below. Don't worry if some of them have a bit of character!


Once your circles are all folded you can take four of them and hot glue them together so that they are stacked inside each other.


Next, adhere a 7" circle of "Swirly Snowflakes" to your 8" chipboard circle. Use your glue gun to adhere each of your sets of folded circles onto it.

If you want to add a few quick sprays of "Marshmallow" Glimmer Mist to your wreath now's a great time to do it....it add's the perfect amount of Christmas cheer! ;)


Next, cut out the words "Merry Christmas" out of the rub-on sheet and rub them onto the doily. -I wanted to jazz my doily up a but more so I weaved a piece of baker's twine around it and then tied the ends into a bow.

Create the holly by using your i-top and a scrap of felt to make a brad. (Here's a video on how to do it if you need a visual.) Then just adhere your leaves and brad to the doily, and then adhere the doily to the center of the wreath. Use your glue gun to add some ribbon to the back side of your wreath so you can hang it up and enjoy it!


Edited to add: Oh my word...I forgot to let you know about the PRIZE we are giving away today!!! Sorry! Add your comment below to enter to win an i-rock and the entire collection of Cottage Christmas!

Merry Christmas!

Friday, November 5, 2010

Dino-Roar Wall Art

Have you been thinking about ways to decorate your child's room without breaking the bank? Is it sometimes tough to find just the right accents, in just the right size, at just the right price???  Well...there may be a solution!
As you can see, my son is obsessed with Dinosaurs at the moment and when I saw the Imaginisce Dino-Roar collection, I knew exactly what I was going to do with it to add some decor to his room. 

I was also lucky enough to come across the amazing Cricut Dinosuar Tracks cartridge.  Together, these crafting materials are an unstoppable locomotion of creativity.  I had a blast making these two pieces of art for my son's bedroom.

You can use the layer and shadow features on your Cricut to bring a "flat" image to life.  I love the contrasting colors of the brown cardstock with the Imaginisce Primordial Ooze paper.  And, the Petrified Wood paper is the perfect compliment to these Prehistoric Pals.
Doesn't this T-Rex look fierce?  My son goes crazy for this one and thinks it is the coolest dinosaur.  He even sleeps with his little T-Rex toy at night.  Guess he must get a lot of comfort knowing he sleeps under the watch of this fierce creature.
I added a few gems with my i-rock to decorate these little guys and then I used an old font folder of rub-ons to add the name of each of the dinosaurs.  Attractive and educational... doesn't get much better than that!


Complete the look...
Find some novel items to add to your child's theme...
Add a dinosaur sheet set from Pottery Barn Kids.

Add a dinosaur library from authors Jane Yolen and Mark Teague from amazon.com.

Add some dinosaur critters from Schleich toys found at Target.

Voila - you have created a very personalized room theme for your special little one and you didn't even break the bank.  How's that for a good thing???

And...to make it even more of a good thing, just leave a comment about a home decor idea you have been cooking up and you might be the lucky winner of your very own collection of Dino-Roar!  We'll announce a winner early next week...

Thank you so much for stopping by - Liz

ADDED BONUS PROJECT (from Lori): 
The awesome Brett Lund recently did a local television segment using the new Dino-Roar Collection and created a darling collage frame with it. We wanted to share the video and link you back the step-by-step instructions on the GTU website.

Tuesday, October 12, 2010

Come play with us at CK Scrap & Play this weekend!!

It's not too late to join the Imaginisce team at the CK Scrap & Play event this weekend in Provo!! Remember, FREE spa treatments, including manicures, color analysis, paraffin wax, and a CHOCOLATE bar!!

Oh yeah and we'll be teaching a fun class featuring the Apple Cider and Cottage Christmas collections AND our popular i-top and i-rock tools!! You won't want to miss this one!!


And we are very excited to announce that Provo Craft/Cricut will be joining us at CK Scrap & Play!  And just wait until you hear what they have in store for you! Expressions, Cuttlebugs, YUDU machines, Gypsies, Knifty Knitters, Cartridges and Cuttlebug folders.  WOW!!!  Members of the Provo Craft team will be on hand to show you how to use the machines. You’ll have the opportunity to play with these incredible products, create make and take projects, and guess what…at the end of the weekend all of these brand new cricuts will be raffled off as prizes. That’s over $3000 worth of incredible tools that you’ll have the chance to win!  Thanks Provo Craft!

Hurry & register for CK Scrap and Play...before they fill up the last few spots!! 

Giveaway!! Can't make it...tell us why and we'll give you a Cricut Gypsy! The best reason why will win!! 

Monday, October 11, 2010

Cricut Circle Swarm, Blog Sneak Peek & Giveaway

Well it's been a weekend full of crazy Cricut fun!! Provo Craft hosted their first official Cricut Circle Swarm! And they asked Imaginisce (an me) to come and demonstrate how to use the i-rock and i-top tools. We presented right after the YuDu demonstration and everyone could silk screen a shirt or bag and then come over to our tables and add i-tops and i-rocks to their projects!! Be sure to scroll down to find out how you can WIN something items from the Swarm!!

Here I am demonstrating to all 200 attendees with my good friend Shannon. She oversees the Cricut Circle and is amazing gal to work with. I want to take her EVERY time I teach, we had so much fun doing this together!!
 We had a great team of ladies helping show all the attendees how to use the i-top and i-rock tools. In fact, we ended up having 8 ladies blinging and topping off everyone's projects!! We love our team and they were a HUGE help!!

Here's part of our awesome team of ladies with me in this photo op (orange shirt gal was there helping Provo Craft, but Amy is one of our best in-house designers)!
Group hug....
 My dear friend Teresa Collins was able to pop in and say HI. She too gave away a great basket of TC goodness and a Cricut Imagine.

Our lucky winner that won an i-rock collection AND Cricut Imagine.
At the Cricut Swarm all the attendees received a Gypsy...and lucky for you I was able to scored some Cricut Gypsy's for prizes for those of you that weren't able to join us. Here's how...

As you may or may not know, the Cricut team has an affinity program called the Cricut Circle and they just launched a darling new Cricut Circle Blog...it's run by the very talented Jana Eubank....and it's only open to the public one last day TODAY!! So if you're interested in winning, we want you go check out their Cricut Circle blog and then come back and leave a comment about something you saw on there that you liked...be sure to scroll back through some old posts, they have cute projects!! We'll pick 3 lucky winners that will receive the Cricut Gypsy (my all time favorite tool)!!

LinkWithin

Related Posts with Thumbnails