Pages

Showing posts with label i-rock. Show all posts

Monday, October 27, 2014

You make me so very happy!

Our design team has been creating some fabulous projects this past month and showcasing the various tools that Imaginisce has.  Today Lanette shares this great project using the i-top and i-rock tools!


"Happy"

Hello All Lanette here! Today I wanted to take a moment  to share  a quick little card using two of my favorite Imaginisce Tools. But first I wanted to let you know a bit about these tools.

First in no particular order is the I-Rock tool. With this too you can permanently affix rhinestones, jewels, pearls, or mirrors to paper, fabric, or even furniture to create a dazzling masterpiece! It's so easy! No need for messy glue. Each package includes one cordless heat setting tool. It truly rocks!

Next is the I Top with it you can transform an ordinary brad into a custom accent in an easy two step process. Just place your paper and blank brads and give a little squeeze.

Now lets take a peek at the card I created using these two fabulous tools!


Here you can see the dimension that the I-Top adds. 


And all the sparkle that the I-Rock adds.


Thanks so much for stopping by today!
-Lanette

 If you would like to find out more about all the fabulous tools Imaginisce has to over just hop on over to the Imaginisce Website


Supplies used:
Imaginisce Products: Pattern Paper -Welcome Spring Pattern Paper & Little Princess,  Rock tool & Rhinestones, I-Top & Brads.

American Crafts- Cardstock, Foam Dots, Mister Hueys Mist.

Wednesday, September 25, 2013

Adding "bling" ... with Jodi

Do you like to embellish your projects?  If so, the i-rock is THE perfect tool for adding bling to pretty much anything!!!  Designer Jodi Wilton shares how she added some Glam Rock 'bling' to her adorable layout.


Doggy or Kitty?

For my project, I really wanted to showcase the i-rock! It is one of my favorite tools that I have been using since it first came out! This layout shows you some of the fun ways you can use your i-rock to embellish your layout.


I love using the hot rocks and glam rocks to create a fun pattern on my paper crafting projects! I usually line them all up to space them properly, and the use the i-rock to set them. It takes no time at all, and you get awesome results.


Another fun idea is to embellish you title! Any little bling really brings focus to your title.


Finally I like to use die cuts (like the Doggy Diecuts) that I used to embellish the collar.  


Supplies:  Patterned Paper, Chipboard, Sticker Stacker and Die-cuts (Good Dog); i-rock, glam rocks, hot rocks; Alpha Stickers (Love you More)  Other: Alpha Stickers- American Crafts

Thursday, September 19, 2013

Goulish Delights by Regina


The i-rock tool can add just the 'right' look to any type of project ... even a spider web!!!
Check out these amazing Halloween card created by Regina Mangum.


Goulish Delights Cards

I decided to create some spooky-good-fun Halloween cards featuring one of my favorite tools, the i-Rock! Of course, I just had to use the absolutely adorable Monster Mash collection.


For both cards, I wanted to use the i-Rock and crystal Glam Rocks to add a bit of fa-BOO-lousness. On my first card, I wanted to really make my spiderweb background pop. 


The i-Rock made adhering the multiple bling a breeze.The Glam Rock compact has several different sizes of stones, which was perfect for the graduated effect on the web.


My second card is a fun one that features this darling little vampire. 


I heat embossed with black embossing powder and added some white accents with a white gel pen. 


Again, the Glam Rocks added so much to really bring my card alive!


Supplies used: 
(stamps, patterned paper, and chipboard stickers from Monster Mash Collection) Imaginisce; (i-Rock, Glam Rocks) Imaginisce; (cardstock) Stampin' Up!; (VersaMark ink) Tsukineko; (Spiderweb Cutting Plate, Spiders & Spiderweb Dies) Taylored Expressions; (white gel pen) Sakura

Tuesday, September 17, 2013

Family Tradition with Suzanna


Sometimes it's not easy to add embellishments to a layout, card or other type of project because the papers and other pieces of the project have so much detail already.  

Designer, Suzanna Lee, shows us how easy it is to add that special little 'touch' just by adding a bit of 'bling' using the i-rock too. Plus she mixes 2 collections (Love You More & Black Ice) together so perfectly!!!


Chinese New Year

I have a layout to share with you today celebrating a family tradition. I am half Chinese and grew up in Hong Kong (little known fact for some of you!). Though it may be "the end of the line", my children have been taught about Chinese New Year and continue the family tradition of the tea ceremony. Red is found everywhere during Chinese New Year and other holidays and family gatherings thus the predominance of red on the layout. Gold, or sometimes yellow, is also a very commonly found color during this time. 


 I used the hot rocks to put little gold centers into the flowers on the 5x7 laser printable invitation for some added "culture".


Supplies
Imaginice; Patterned Paper: Childhood Memories, Love You More, Black Ice; Chipboard: Childhood Memories; 5x7 Invitation: Black Ice, iRock tool, Hot Rocks
Other: Die: Memory Box, Silhouette Cameo, Font: Britannica Bold

Monday, September 16, 2013

Sunshine Fun with Mary Pat

What are your go-to tools? 
Punches?
Scissors for fussy cutting?
Die-cut machines?


Design Team member, Mary Pat Siehl, can't live without her i-rock and i-top Imaginisce tools. She loves them and she created this super cute layout using both of those tools.


Sunshine Fun

For my project I used two of my favorite tools- the I Rock and I Top.  I couldn't scrap without these two tools.  I love the I Top because brads are one of my favorite embellishments.  

For this project I used the small, medium and large brad daddies and I scattered them in on my project to create a visual triange on the layout.  


Then surrounding the brads I added some bling with my I Rock.  I also used the I Rock and Hot Rocks to add a bit of bling on my sun rays.  I love how it gives the layout a little something more!


supply list
paper-die cuts- imaginsice
I Rock
I Top
Brad Daddies
cardstock, tags- Core'dinations
Silhouette
twine- the stringery

Thursday, September 5, 2013

Rockin' the i-rock with Jennie


Today design team member Jennie McGarvey shares 3 fabulous cards.


Hello!  I am happy to share with you 3 cards I made using the iRock tool!  This tool is so easy to use and makes it fun to add a bit of sparkle or interest to any project.  I love using both crystals and hot rocks on my projects, but I do find myself reaching for the hot rocks often.  

For this first card, I knew that I wanted to mimic the effect of splatters on my card.  So, after I stitched it, I went to town sprinkling the hot rocks.  Once I was happy with where they landed, I used the iRock to set them on the page.  VERY easy and cute!


For the star card -- I knew that the crystals would be the perfect accent to add  a little bit of interest to the speech bubble and star.  Stars just need a bit of sparkle!


And the last card, I wanted the heart to be the message.  So, adding one lone hot rock really draws you in, reinforcing the cards message!


SUPPLIES:
i Rock tool
Hot Rocks Crystals
Hot Rocks Jewel Compact

Paper: 
Childhood Memories

Stickers:
Childhood Memories (Camera)

Wednesday, September 4, 2013

Party Favors by Marcia

We've got another great project to share with you today 
created by 


"Baby Shower Party Favors"

I am having fun helping my sister plan a baby shower for my niece. She is having a boy!! I decided to make some party favors for table decor. I wanted to stick with primary colors and thought building blocks would be fun and playful. These block boxes open, so I can tuck some candy away inside. They can be spread around, or stacked to make more of a statement. My niece has selected a jungle theme for her nursery, so I added a few die cut animals.


Now, if you are planning a shower and the Mom-to-be is expecting a girl, Don't Worry. I got something for you too. Aren't these baby booties adorable? 


I used a couple Imaginisce tools to make these. If you love crafting with ribbon, then the i-Magicut Ribbon Cutter is a must for you. No more frayed ends! It's so easy to use too. Turn it on. Open it up. Place your ribbon on top. Close. Press button on top for about 5 seconds. Easy Peasy!


I also added bling to both the baby booties and the building blocks. A little bling just makes them more festive. These lighted tweezers makes it so much easier to see what you are doing.


Once the bling was placed where I wanted it, I used the i-Rock to adhere my gems. 


Supplies:
Imaginisce Pattern Paper: Childhood Memories, Outdoor Adventure, and Love You More; i-Magicut; i-Rock; Lighted Tweezers; crystal gems
Kraft cardstock: Core'dinations; Silhouette cut files; Quick Quote Chalk ink in Maraschino Cherry and Blue Moon, Ranger Distress ink in Wild Honey and Tattered Rose; Ribbon

Wednesday, July 31, 2013

Endless Summer with Cari

Well, today brings us to the final day of our Designer-a-Day feature.  Thanks for joining us this past month as our designers shared their talents. We hoped that you enjoyed it!!

Today we have our DT Coordinator, Cari Locken, sharing this super fun summer album.


"Hot Summer Days"

I created this little mini album using Endless Summer collection of patterned papers, diecuts, stickers, etc and some summer pics. All I needed to get started was some chipboard which I cut to 6" x 4" pieces.


 I began by printing out my photos - 7 of them at 4" x 6" each. I adhered each one on a piece of 4x6 chipboard and corner rounded the top & bottom right edges.

I then covered the other side of the chipboard with patterned paper. I tried to find papers that went with my photos.  After the papers were adhered I used the d-stress tool to clean up and sand the edges a bit .  This is a great little tool for that because often the paper isn't the same size as the chipboard and it hangs over the edges. Well, this tools sand over the excess and creates a clean edge.


After all the pages were covered and embellishments added I used my i-rock tool and some glimmer i-rocks to finish the design off.


The cover of the mini is a clear acrylic piece. I adhered a sticker stacker to the center.


Then on the back of the clear page I took another sticker stacker and adhered it to some patterned paper. I then cut around the sticker and adhered this to the clear page. You then see the green patterned paper showing through on the front cover. I embellished the front (on the green part but on the clear page) with some i-rock gems.


 Here's a look at the inside pages.
You will notice that I kept my album design farily simple & repeated the same design throughout.
One side with patterned paper, embellishments & journaling. The other side the photo.


On each left side I typed my journaling onto white cardstock.  I cut thin strips of blue cardstock and embossed each one (3 different designs) for some added visual interest & texture.


I also added foam squares/tape for added dimension on some of the diecuts and stickers.


And the back cover.


Supplies used: Imaginisce (Endless Summer Collection: patterned papers, diecuts, sticker stackers), i-rock tool and Glam Rocks; foam tape; d-stress tool
Other: Core'dinations Colorcore Cardstock, chipboard; Xryon glue stick, Sookwang double sided tape, Cuttlebug embossing folders & Cuttlebug, May Arts (Ribbons)


************

Thanks again for stopping by today. We hope that you were inspired by all of the projects this past month.

Please make sure to join us tomorrow as we share our new Monthly Challenge and announce last month's winner!!

Thursday, March 7, 2013

Rock it Out! Day 4


Today brings us to our last day showcasing some fabulous i-rock projects.

We've got some handy little tools that will help you handle the gems & rhinestones ... such as the Lighted Tweezers and the i-rock Jewel Tray.
 

The tweezers make it so easy to place the rhinestones exactly where you want them. Plus the Jewel Tray makes clean-up a breeze as you just twist off the cap at the end & dump the rhinestones back into the tube.

Design Team member, 
has created several stunning projects using the i-rock tool.


This week it's "I-Rock" week at Imaginisce's! For my I-Rock projects I knew exactly what I wanted to do: I wanted to decorate a tin I’ve been saving for an occasion like this and I wanted to do a layout (as that’s what I love to do most). 

Altered Tin
Let’s start with the tin; originally it looked like this: 


And now it looks like this: 


The crystals add just the perfect finishing touch!


The I-Rock tool quickly became one of my favorite tools. It’s so very easy to use: insert 3 AA batteries (it's cordless), put the switch on "on", press button down to start heating the metal tip (15 seconds) and while you keep pressing the button down you gently touch the top of the crystal to melt the glue on the back. This takes only a few seconds, depending on the size of the crystal. 


I also love all the extra's you can get for this tool, like the jewel tray and the tweezers:


Supplies Used: Imaginisce (Love You More: patterned paper, sticker sheet and washi tape; I-Rock stencil kit). Tool: Imaginisce I-Rock.


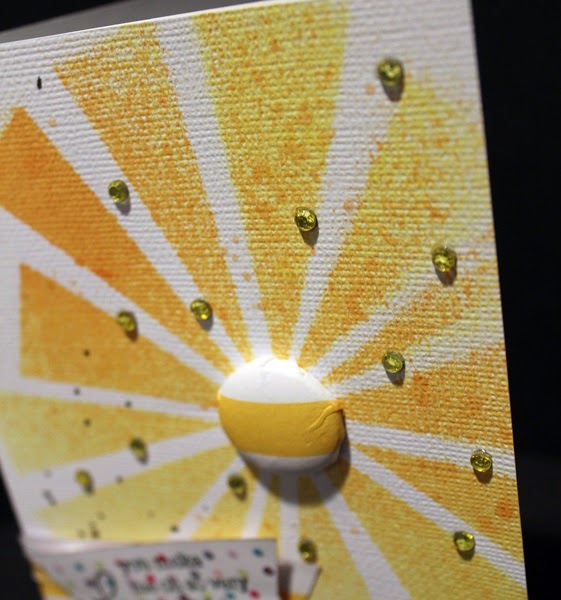
And to show you these crystals are also perfect for a boys layout I created this page about my youngest fitting caps. Instead of the soft pink crystals I used for my other project I've chosen bright blue and orange crystals for this project.

LOVE YOU


and a few close-ups of the crystals:


I really love how this turned out. From now on the I-Rock tool will be within reach for every project I create!

Supplies Used: Imaginisce (Good Dog: patterned paper; Childhood Memories: sticker sheet; Rhinestuds).
Other Supplies used: Bazzill cardstock, October Afternoon washi tape, Studio Calico color mist.Tools: Imaginisce I-Rock, Silhouette Cameo, TCW mask.

Thanks for stopping by and I hope I've inspired you to do some scrapping today!
Monique


GIVEAWAY!
Would you like to add some sparkle & bling to your life??
Well, now's your chance!

We're giving away 1 i-rock tool, 1 compact and 1 tube of Glam Rocks.
All you have to do to enter is leave a comment on today's post and let us know what you would use the i-rock tool for.
(Winner will be announced tomorrow, Fri., March 8th)

LinkWithin

Related Posts with Thumbnails