Pages

Showing posts with label Mini Album. Show all posts

Wednesday, July 31, 2013

Endless Summer with Cari

Well, today brings us to the final day of our Designer-a-Day feature.  Thanks for joining us this past month as our designers shared their talents. We hoped that you enjoyed it!!

Today we have our DT Coordinator, Cari Locken, sharing this super fun summer album.


"Hot Summer Days"

I created this little mini album using Endless Summer collection of patterned papers, diecuts, stickers, etc and some summer pics. All I needed to get started was some chipboard which I cut to 6" x 4" pieces.


 I began by printing out my photos - 7 of them at 4" x 6" each. I adhered each one on a piece of 4x6 chipboard and corner rounded the top & bottom right edges.

I then covered the other side of the chipboard with patterned paper. I tried to find papers that went with my photos.  After the papers were adhered I used the d-stress tool to clean up and sand the edges a bit .  This is a great little tool for that because often the paper isn't the same size as the chipboard and it hangs over the edges. Well, this tools sand over the excess and creates a clean edge.


After all the pages were covered and embellishments added I used my i-rock tool and some glimmer i-rocks to finish the design off.


The cover of the mini is a clear acrylic piece. I adhered a sticker stacker to the center.


Then on the back of the clear page I took another sticker stacker and adhered it to some patterned paper. I then cut around the sticker and adhered this to the clear page. You then see the green patterned paper showing through on the front cover. I embellished the front (on the green part but on the clear page) with some i-rock gems.


 Here's a look at the inside pages.
You will notice that I kept my album design farily simple & repeated the same design throughout.
One side with patterned paper, embellishments & journaling. The other side the photo.


On each left side I typed my journaling onto white cardstock.  I cut thin strips of blue cardstock and embossed each one (3 different designs) for some added visual interest & texture.


I also added foam squares/tape for added dimension on some of the diecuts and stickers.


And the back cover.


Supplies used: Imaginisce (Endless Summer Collection: patterned papers, diecuts, sticker stackers), i-rock tool and Glam Rocks; foam tape; d-stress tool
Other: Core'dinations Colorcore Cardstock, chipboard; Xryon glue stick, Sookwang double sided tape, Cuttlebug embossing folders & Cuttlebug, May Arts (Ribbons)


************

Thanks again for stopping by today. We hope that you were inspired by all of the projects this past month.

Please make sure to join us tomorrow as we share our new Monthly Challenge and announce last month's winner!!

Tuesday, October 11, 2011

Bon Voyage Travel Mini Album

Hi everyone!  Heather here to show you a little something I made with the new Bon Voyage collection. 

Now that summer is over, if you're like me you probably have a ton of vacation or "staycation" photos ready to be scrapped.  Sometimes the hundreds of photos can be overwhelming when planning out layouts so when I'm in that situation, what I like to do is pick a few random photos that show off the highlights and put them in a mini album. I left more blank space than usual so that I have room to add ticket stubs and other little souveniers from our outings.

So, here's the "suitcase" mini I made. I blinged out the centers of the compasses and a few other elements with the i-rock and added more dimension using the i-top. Now I just need to insert my pictures and write the stories!


Thanks for stopping by!  I'd love it if you'd share (in the comments below) any tips you have for scrapping the gazillions of summer photos you take.

- xoxo Heather

Tuesday, August 9, 2011

Birthday Mini Album Fun!

Greetings to you from Rhonda Van Ginkel!

I'm so excited to share with you a little mini album that I created for our son's third birthday.

I used to feel slightly intimidated to take on a mini album, but don't ask me why! Now they are now one of my favorite projects to do. Maybe it's the sense of accomplishment, or just the personal satisfaction of creating a book of sorts.

Whatever "it" is, they are worth every creative moment spent!

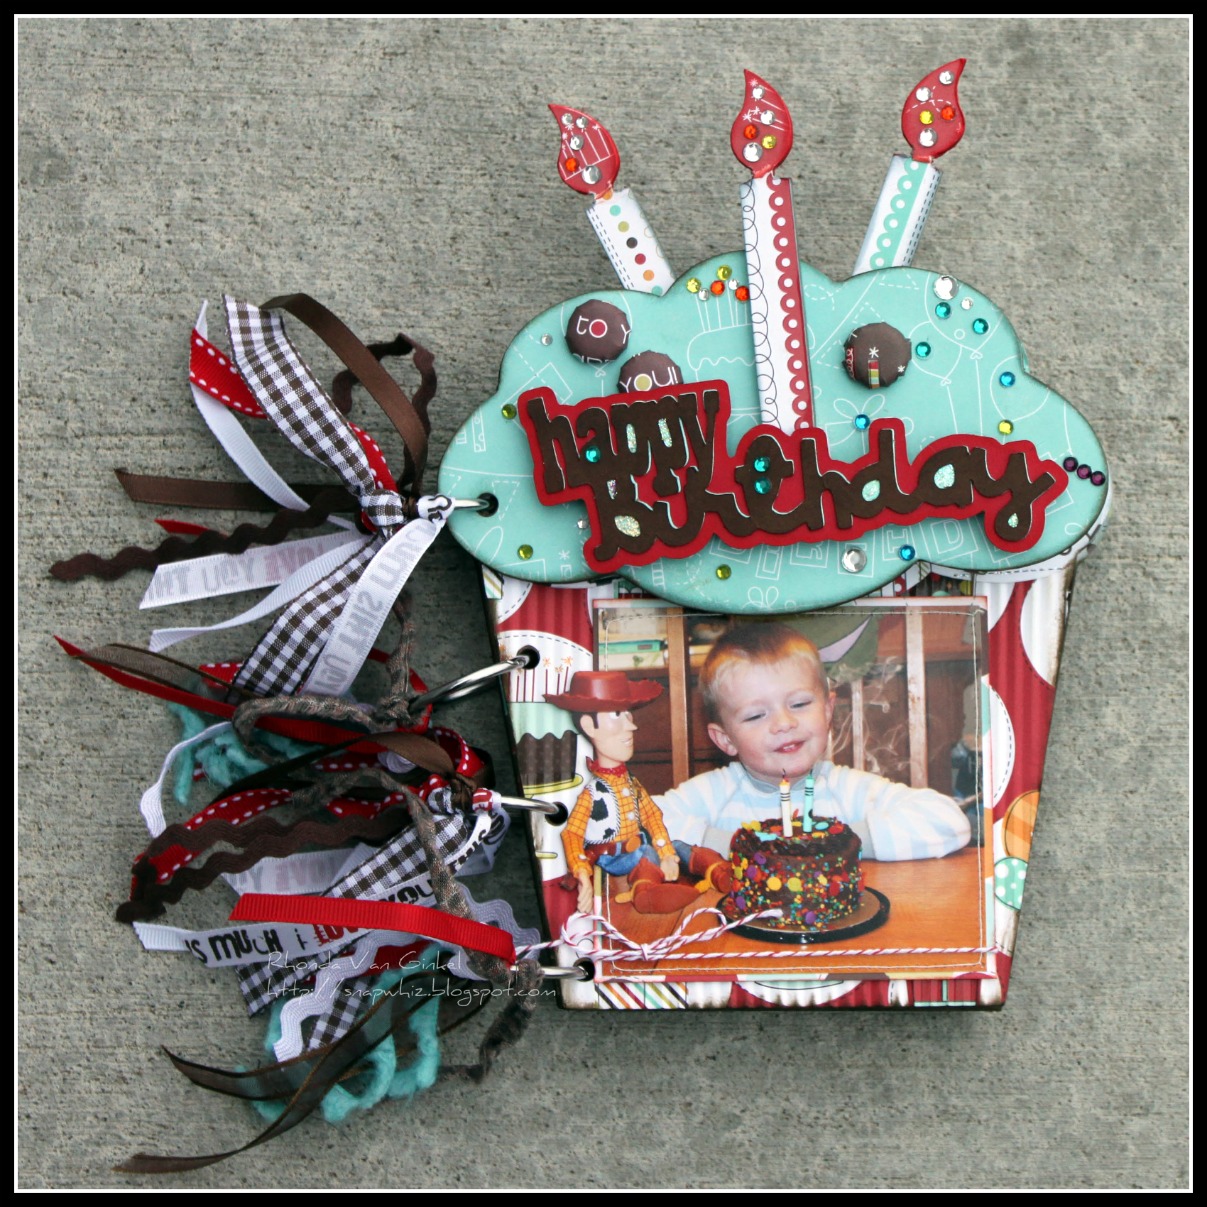
This project was created using the super fun Imaginisce Birthday Bash line, my Cricut Expression and "Sweet Treats" cartridge. The base album is an MDF Cupcake Mini made by our friends at Kaisercraft. Without further delay, let me show you the sweet side of this mini!
I used my handy dandy crimper for the front page to bring the cupcake feel to life. You'll notice the little bit of silhouette cutting of my photo to draw a little attention to Woody. Some i-Rock gems and i-Top brads were the perfect extra little touches to help complete my title. Personally, I love the gems on the candle flames quite a bit too.
I used the little rocket shape and placed it on foam dots to help disguise my candles. The title banner was cut out and there is a tab for the hidden journaling pocket.
Fortunately, I was able to capture several fun pictures on this day. You can see the boys were pretty pleased that Daddy brought home some breakfast birthday cake! (Yes, he did blow out all of his candles too!) I used a few tickets to tuck behind the photo to journal on for each of the boys.
May all your wishes come true! This page is subtle, but if you look closer, you'll see I used a punch and then filled in the holes with some Ranger Enamel Accents in white. This birthday for him was all about Toy Story!

The next few pages are some of my favorites, just because it really captured his super silly side so well. He had me almost in tears that morning, it was very funny!!!

Sometimes the best fun is the simple stuff, no? After opening his gifts, what did he go and play with? he he!!! I wanted to capture all of these moments that are part of his personality as he turned 3 years old.

On my back cover, I included a photo from his big party. I chose to do a little silhouette cutting on one of his gift photos to help simulate the shape of the cupcake.

For this mini I kept the interior pages pretty basic and used texture and dimension mostly on the cover. Since this is for our son, I wanted him to be able to flip through the pages easily.

Hopefully you enjoyed the album and perhaps I've even inspired you to take on a mini album project or two! Go for it and especially dig into those fun Imaginisce products and have fun with it!!! Have a fabulous day!

Monday, May 30, 2011

Matchbook Notes Tutorial

We all love the "Happy Camper" line for creating the perfect camping scrapbook layout, but it can be used for so much more!!

Today I'm going to show you how I created this adorable 5"x5" matchbook notebook:
Supplies:
  • 1 Sheet of "Thermal Jammies" patterned paper
  • 1 Sheet of "Don't Feed The Bears" patterned paper
  • "Story Telling" Sticker Stacker
  • Notebook paper (I used copy machine paper)
  • Magnets
  • Doily
  • Button
  • Twine
  • Clips (1 for the cover & two office binder clips for to glue the notepad together)
  • Ribbon
  • Chalk Ink
  • Scallop punch (you may want another design for the flap as well)
  • Hole punch
  • Brown Pen
  • Letter die-cuts (you can download my "notes" Silhouette Studio cut file here.)
  • Adhesive (I used my ATG gun, Tombo Mono Multi, and Glossy Accents)

Instructions:
Note: I used my Silhouette (shape: "matchbook notepad simple") to cut out my matchbook, but my instructions will show you how to create the base of the notebook without a die-cut machine.
  1. Cut "Thermal Jammies" paper to 12" x 5". Punch one of the short edges of your paper with a paper punch of your choice (this will be the bottom tab) and then trim the overall length to be 11".
  2. Score your paper, starting with the punched edge, at 1", 5 ¾", and 6 ½". Fold on the score lines.
  3. Use a scrap of the same patterned paper to cover the 1" flap you've created... just flip it so the pattern on the other side (stripes) shows and punch it so it matches the punch you originally used. Ink the edges and folds of the notebook.
  4. Cut a ¼" piece of brown striped paper off of the edge of the Sticker Stacker sheet. Add that to the flap along with a button.
  5. On the back side of the flap place a magnet on the flap and onto the front of the notebook where they meet. (I used Basic Grey magnets.)
  6. Adhere a doily to the cover. Because my magnet was under the delicate parts of the doily, I added a drop of Glossy Accents over the doily that covered the magnet so that it would not rip.
  7. Scallop punch a 4 ¼" x 1" piece of "Don't Feed The Bears" patterned paper. Adhere that to the bottom edge of the sticker and then adhere it to the cover.
  8. Use a die-cut machine to cut out "notes" out of the same paper...I used my Silhouette and you can download my cut file here. Adhere it to the front of the sticker. Add some faux stitches around the scallop under the sticker and the "notes" die-cut.
  9. Use a small hole punch to take a little "bite" out of each side of the cover of the notebook so that when you wrap the twine around it it won't slip. Tie the twine into a bow.
  10. Add the clip with ribbon tied to it to the sticker.
  11. To create the actual notebook paper that goes inside, cut a stack of paper to 4 ½" x 4½" ( I used about 40 sheets) and place a binder clip or two onto it to keep it steady. Apply a thin layer of Tombow Mono Multi to one edge and allow to dry and then remove the binder clips and adhere it to the inside of the notebook.


Here's how the inside will look when you have everything in place.

I hope you enjoyed this tutorial! Stop by my blog to enter my drawing for a big Imaginisce goodie box!

Tuesday, March 22, 2011

Bling'n the Mini!

Are you ready for some more I-rock inspiration?


Well, today we are "Bling'n the Mini!" What better way is there to finish off a mini album than to add a touch of bling? There is no easier way to make your project go from looking ok...to WOW! in just a few minutes, using the I-rock.

Below are a few sneak peeks of what a few of our design team members have created. But...you will have to visit each of the designer's blogs to find out what they made...


Heather Leopard

Now, after you've visited each blog on our mini blog hop and left a little comment, make sure you hop on back to the Imaginisce blog and leave one final comment for your chance to win an AWESOME prize!

We would love for a lucky follower to have their own obsession with bling. To make sure that happens, we are giving away an amazing
i-rock bundle of goodnessto a randomly drawn follower who hops to each of our designers blogs, leaves a comment on each of the blogs and then hops back here for a final comment about some of the ideas they would like to try with their very own i-rock.

Hope you enjoy the hop!

Sunday, February 7, 2010

Featured Project: Name Badge Mini Album by Cindy

We are very excited to share this fun project that our talented Cindy Stevens created with our new Scooters Vacation Collection. And she created it with plastic name badge cases...read on to find out more!!

(Cindy Stevens) I made this mini to document some fun photos from a cruise that we took to Bermuda last Spring with a group of close friends. Since our vacation was so low key, I wanted to make a fun, little album that wasn't too fussy. I wanted something that was on the durable side, since I plan to leave it out and my 5 year old LOVES looking at pictures, so I know it will get handled lots.

How To: This mini is a super quick, easy and inexpensive project and the Scooter's Vacation line was fabulous for a fun, travel themed project. I used a pack of standard sized ID badges (this one had 6) I picked up at the local Dollar Store. I measured and made a template of my base pattern paper and then I used some diecut shapes that I had in my stash, traced them on the WRONG side of my pattern paper and then hand cut them. I then attached these to some of the pages for intrest. I used rubons a fair amount to help keep my album flat and streamlined BUT added some epoxy sticker accents on the outside of the badges to dress it up a bit more. I finished the album off by threading ribbon from the Scooter's Vacation line through the pre-punched holes and fastened.

Thanks Cindy!!

LinkWithin

Related Posts with Thumbnails