Pages

Showing posts with label Sunny. Show all posts

Wednesday, May 18, 2016

Memorial Day BBQ

Memorial Day is coming up so we asked out Design Team to create projects around this theme.
So to start us off we have Katie sharing this wonderful layout!


Katie Rose

Hi everyone! Katie here today sharing a layout about Memorial Day using the Sunny Collection. I was totally inspired by the watermelon patterned paper to create a layout about a Memorial Day BBQ we had a few years ago. I printed several photos from the afternoon and paired them with large letters I cut from my Silhouette Cameo for my title. I put the title on the top half of the layout and the photos on the bottom half to balance things out. Here is a look at the layout:


I cut the other words of my title smaller and in a different font and placed them across the large letters and stitched across.


I added two strips of patterned paper across the bottom to add a little more color. I also added diecuts to the top and bottom of the layout. 


I added just a little bit of journaling near the title with the date to finish it  off.


The Sunny collection is perfect to document your summer BBQ's, parties and picnics!


Supplies:
Imaginisce: patterned paper, die cuts (Sunny)

American Crafts: cardstock

Wednesday, May 11, 2016

Sweet Summer

Do you love using your digital die cut machine? Then you'll love this post because Design Team member, Laura, has another fabulous FREE svg cut file for you!!!


Laura Whitaker


Hello crafters! It's Laura here today with a new layout to share, using the Sunny collection.  This time I opted for a more muted and quieter page than my usual bright and vibrant layouts.


For the last several summers we have vacationed on this lake, and as such spent a lot of time cruising around on it.  ( I do not imagine things will change much in the near future as we made a permanent move to this lake.) One of my son's favourite spots is this rope swing that is nestled off the side of a public island.  Unfortunately it is really a tough spot for photographing his fun as the sun shines into the camera all day long.

As a result my photos are a little dark, which is why I wanted to keep my page light and soft.  To do this I pulled lots of yellows, greens and turquoise from the collection


I started my page by creating the background, adding in some water colour paints in colours pulled from the collection.


Then I built my patterned paper layers under my photo strip, doodling a bit for impact and to tie in the dark colours of the photos.


I tucked in a cut apart journaling card to the right of my photos, and added a bit of journaling and my title.  I did a little machine stitching just for fun.  And used a Dear Lizzy stamp to add in the date.


I filled in a little of the white space with some ephemera in the lower corner of my layout, to repeat my colour combination.


Lastly, I created and added this fun sunshine sequin embellishment.  I put American Craft sequins, Imaginisce Par-r-rty Me Hearty puffy stickers and a couple of little punched hearts into it.
 

I punched a piece of plastic from the ephemera packaging to cover the sequin sun with.

If you want to create your own sequin sun, please click on the image below to head on over to my download page to get a copy of my free cut file.

https://app.box.com/s/zfyau8lcmh3ungm0z8nowpxxb16m736o

It is available in Silhouette, SVG, PNG and PDF (to create a fussy cutting template) versions.

Supply List:  Imaginisce Sunny collection patterned papers, ephemera, alpha stickers, 3D stickers; phrase stickers; Imaginisce Par-r-rty Me Hearty collection puffy stickers; American Crafts cardstock, sequins, and enamel shapes; Art Alternatives Clear Gesso; Artists Loft water color paints; Dear Lizzy date stamp; Memento Tuxedo black ink, Mr. Huey's mist.


Thanks for visiting crafty friends!

Monday, May 9, 2016

Hello Sunshine (pocket-letter style!)

Have you heard about pocket pages and pocket letters? No?
Well, then you're in for a treat today.  Check out this awesome way to celebrate a season, birthday, special event, etc. The possibilities are endless!


Nathalie Leonelli

Hi there! I am back today to share a pocket letter celebrating the approach of Summer. I love making, sending and receiving pocket letters but if you are not familiar with them, you can read more about the basics of pocket letters on my blog. The Sunny collection has so many fun papers and elements that it is perfect for this kind of project!


For three of my pockets I cut down ready-made cards from the  "Good Vibes" paper and the rest was cut from different patterned papers from the collection. You can see many of the goodies I am sending but, amongst the stuff you can't see, there is a letter to the recipient which is clipped behind the "Hello Sunshine!" card and a tea bag (added after the photo was taken) behind the "4 you" flamingo card:


I used my We R Memory Keepers 1-2-3 Punch board to create this little coin envelope out of the "Camera Love" paper. It adds interest (and mystery)... what's inside? Sequins and crab die-cuts :)


I hope to have inspired you to have fun with your Sunny collection because I did! And do give pocket letters a try! You won't regret it!


Happy crafting!


Supplies: Imaginisce: patterned papers, die-cut shapes, sticker stackers, phrase stickers (Sunny collection); American Crafts: ribbons, Thickers; Simple Stories: enamel dots; Freckled Fawn: washi tape; Staples: paper clips

Monday, April 25, 2016

Sandcastles

Do you remember building sandcastles? I know I do and I've enjoyed creating many with my own children over the years when we've gone to the beach.
Check out this beautiful, fun & colourful layout by DT member Luara.


Hello scrapping friends!  I have a new layout to share using the super fun Sunny collection today!  


While scrolling through a bunch of photos trying to decide on one (some) to use for today's reveal I came across this one taken last summer of my son making sandcastles at the beach in a park where we used to have a trailer to spend our summers.  The photo had me thinking that I should create a sandcastle cut file, which then led me to create this truly whimsical layout.


I began my page by cutting this large sandcastle outline and a coordinating solid sandcastle.


Then I matted my photo and added a few simple layers behind it including the 3x4 cut apart journaling card, which called for some fun beachy embellishments!


I also cut a large sun from some of the yellow and red patterned papers - I am so loving how vibrant this collection is, it makes me happy and dreamy for summer days!


Next I created my title area, using some of the Sunny collection alpha stickers and phrase stickers.  I love mixed font titles!


One last embellishment cluster in the top left hand corner to complete a visual triangle.


To finish off my page, I sprinkled some yellow watercolour paint around my page.

Supply List:  Imaginisce patterned papers, ephemera, alphas stickers, phrase stickers, 3 dimensional stickers; American Crafts cardstock, brown Precision journaling pen and orange sequins; Artists Loft water colour paints.

Thanks so much for visiting!

Friday, April 15, 2016

Must Love the Lake

Our Design Team have been whipping up some amazing projects with our Sunny collection.  Have you had a chance to see them?


Hello Scrappy Friends! Laura here today sharing a new layout using the fun and fabulous Sunny collection!


As the outside temps are starting to rise in my neck of the woods, we are daydreaming about all of the summer fun we have planned.  High on the list is time on the lake, which is what inspired toady's layout.


I aimed for a fun, bright and airy page that feels like summer. This layout hit the mark and was super quick and loads of fun to put together.


I started my layout by cutting the layers that my photo and title are sitting upon.  Knowing that I wanted to use a 3x4 cut apart card to hold my title gave me my basic layout. Prior to adhering my layers down I added some sprinkles of water colour paints to my white cardstock background. Then I added a bit of machine stitching for a fun bit of texture and next I got busy creating my title.  I love the way that these translucent letter stickers look, and they layer great with my large die cut "lake" word to create a multi font title.


After arranging my title, I added in a cluster of embellishments.  The sun was cut from a 3x4 cut apart card and the little crab was part of a larger dimensional sticker element that I took apart.


I created a second but smaller cluster of elements below my photo, so that my journaling had a pretty place to land!


One last, and smaller still, embellishment area to the top left of my photo completes my visual triangle.  This phrase was created by trimming down a dimensional sticker, I saved the other half for a future layout.

As a last step, I added some splatters of Heidi Swapp Color Shine in Citron.


Imaginisce Supplies: Sunny collection patterned papers, 3D stickers, die cuts, letter stickers, and phrase stickers.

Other Supplies: American Crafts Cardstock; Leow's watercolour paints; Heidi Swapp Color Shine in in Citron; Hemptique button twine; MME buttons; Staedtler fine tip felt pen.

Thank you for visiting and don't forget to play along with our April sketch challenge! 

Wednesday, April 13, 2016

Beach Fun

Who loves going to the beach? Well, if you're a beach lover than you're going to love this layout by DT member Nathalie!


Hello! I am here today to share a new 8.5x11 layout created with the fun and bright Sunny collection. This collection has totally inspired me to dig through last summer’s photos from our vacation at the beach:


One of my favorite things in the collection is the pack of ephemera and it was the starting point for this page. Once I had selected my photos I worked on the cluster at the bottom of the page. I love the mixture of die-cuts, acetate shapes and Sticker Stacker! I added a few stitches to ground the grouping a bit more.


The photos are layered on the B sides of "Fun in the Sun" and "Sweet Melon". The pretty "Hello Summer!" strip comes from the bottom of the "Sweet Melon" paper.


A few more pieces from the ephemera pack were added to the top part of the page, balancing the bottom heavy page. Isn't that sun the cutest?! 


A side note regarding the acetate shapes in the ephemera pack: it's hard to see but don't forget to peel off the plastic film on top. You will discover a much brighter and shinier embellishment once you do :)


My design is based on the April sketch on the Stuck?! Sketches blog (by DT member Laura Whitaker). Here's one more look at the finished page:


One thing for sure, this colorful collection will make you long for Summer… 
Thank you for stopping by!


Supplies:

Imaginisce: patterned papers, Sticker Stackers, ephemera pack (Sunny collection), enamel dots; Amy Tangerine for American Crafts: date stamp; Georgia-Pacific: cardstock

Monday, April 11, 2016

Carnival Cruise 2016


We've got another amazing week of inspiration from our talented Design Team members. DT member Kate uses our Sunny collection and we just love her clean design!


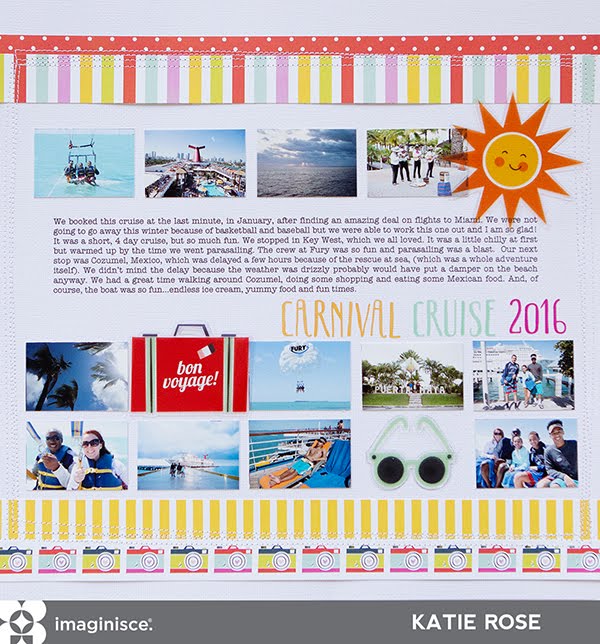
Hi everyone! Katie here today sharing my most recent layout using the new Sunny collection! This collection is perfect for documenting our cruise vacation! I knew I wanted to use a lot of photos on this layout so I went with a modified grid design using smaller sized photos. Here is how the layout came out:


I knew I wanted to add some of the diecuts from the Sunny collection in my my grid so I sized my photos to be about the size of some of the diecuts. I then arranged them in 3 rows. I also had quite a bit of journaling to add so I decided to put it in between two rows so it would be in my grid design. 


To finish it off I added a couple of strips of the adorable patterned paper to the top and bottom of the layout and stitched around the entire border. I created the title using the letter stickers from the Sunny Collection, making each word a different color.


I hope I inspired you to use the Sunny collection on your next vacation layout!


Supplies Used:

Imaginisce: patterned paper, diecuts, letter stickers (Sunny)

American Crafts: cardstock

Friday, April 8, 2016

Sunny Card Set

Wrapping up our FREE THEME month is design team member Melissa with these stunning cards.


Hello everyone,
Melissa here with you today and I’ve got a couple of cards to share. I’ve been eyeballing the 3D stickers in the Sunny collection and thought I would try them out on the cards. Let me tell you, they are so much fun! The great thing with them being so dimensional is that, you don’t need much else on your card. I’ll walk you through my two cards.
Here is the first one using the 3d sticker titled Bon Voyage:


For this one, I decided to a couple of the pattern papers to create a simple card base. Then, I used a canvas tag from my stash to create a layered cluster. This was so easy! All it took was adhering the 3d sticker on top of the tag. And that was it! It’s almost too easy, isn’t it?


Finishing the card off with some twine adds a nice touch, I think. How cute is that card to give to someone, you know, going on a trip?
For the next card, I decided to do some deconstructing of the 3d sticker.


This time, I had to throw in some ink splatters to add some texture to the card. Again, this card was too easy to put together! I took off the word ‘good day’ from the 3d sticker and used it as its own element. 
I dug out a circle tag from my stash and used that to create a modern and simple cluster on my card. I really like how it mimics the suns shape.


I hope that these two cards have you wanting to dig into your 3d stickers! They really are so much fun and work perfectly! Now, go make yourself some cards! 


Supplies:
Imaginisce Product Used: Paper, 3d Stickers, Letter Stickers – Sunny Collection

American Crafts Product Used: Twine

Wednesday, April 6, 2016

Hello Sunshine Travel Journal

As we mentioned earlier this week our Design Team have been given the chance to create whatever they want this month.

We love how Monique has use the i-Rock tool on this beautiful travel journal!


Hi everyone! Monique here today, sharing a travel journal. A few weeks ago I shared a travel clipboard here on Imaginisce's blog using the "Sunny" collection (which you can find here). While I was busy decorating that clipboard, I thought it would be really nice to have a travel journal as well, which I could then bring with me when we go on vacation. As I really adore Imaginisce's Sunny collection I decided to use it to decorate a plain kraft notebook I had lying on my desk and turn it into this fun & bright travel journal:


Isn't it awesome? The happy colors and pretty designs are just so perfect to use for a travel journal, like for example these die-cuts:


I used Imaginisce's I-Rock tool to add some beautiful pink metallic glam rock hearts:


And I also used Imaginisce's I-Magicut Ribbon Cutter & Sealer to cut and secure the ribbons I used to decorate the wire on the side of my journal, so they wouldn't start fraying while traveling.


And now I can't wait to go on vacation and use this journal every day to write down all of our adventures!

Supplies:
Imaginisce: patterned papers, die-cut shapes, alphabet stickers, word strip stickers (Sunny collection). glam rocks. Tools: Imaginisce I-Magicut Ribbon Cutter & Sealer, Imaginisce's I-Rock tool.

And next I've got another little project I would really like to share. It's a week in my planner which I decorated with little bits and pieces from the Sunny collection as well. Even though I decorated the first week of March and used a summer (!) collection, I'm really happy with the result.


It so happens that after weeks of grey and cold weather here in The Netherlands, the sun was finally peeking through the clouds and all of a sudden I only wanted to use summer scrapbook items for my planner!

The stamps in this collection are SO fun for decorating your planner pages. Where I live everyone uses his/her bike every day, so the bike stamp had to be included!! But also the camera and the sentiment stamp are just great! 


And what I also love to use for my planner pages are those strips of paper you find at the bottom of each of the patterned papers in this collection. I think my favorite is the strip of paper with the row of camera's! 


Supplies:
Imaginisce: patterned papers, die-cut shapes, word strip stickers, stamps (Sunny collection).

Thank you so much for stopping by Imaginsice's blog today! Hope you enjoyed my projects.
xoxo
Monique

LinkWithin

Related Posts with Thumbnails